Find The Help You Need

Home > Help

Beginners Guide To Using MS Visio [6 Step by Step]

Guide To Using MS Visio

Create beautiful diagrams, drawings, and basic diagrams in the diagramming area with Visio. Design flowcharts, wireframes, floor plans, and more. Learn how to use Microsoft Visio with 6 easy tips and tricks from us. These tips will help you create click design diagrams in just a few basic steps. Whether you are a beginner or have some experience, these tips will guide you in creating a basic diagram using Microsoft Visio. 

Let’s get started!

Admittedly, the first time you open Visio can be difficult and confusing, especially if you’re new to the Microsoft Office interface. When you open Visio, a dialog box will appear on the screen. To start using Visio, navigate to the home tab and explore the various features available. Don’t forget to preview your work before finalizing it. Even if you have used other apps from the same brand and you’re familiar with its click design, Visio’s diagrams and canvas view could still be a little hard to navigate.

But no worries! This beginner’s guide will be your assistant in figuring out the basics in Visio, so you can become fluent in using diagrams, charts, and drawing pages in no time. Just click design to get started. Even if this is your first time using an app to create diagrams, you’re in the right place to get started. Open Visio and click on the design canvas to access the drawing page.

What Exactly Is Microsoft Visio?

Microsoft Visio is an office tool that allows you to create versatile diagrams and flowcharts. With its user-friendly interface, you can easily navigate through the drawing page and access various shapes and arrows from the shapes window. It’s a handy tool for all your project needs. No matter if you’re a teacher or an engineer, Visio has all the right tools, shapes, and functions to aid you in your drawing and diagram projects in the office. With Visio, you can create detailed and precise diagrams on a digital canvas. It’s easy to design and customize your own diagrams.

With an array of drawing shapes and editing tools, you can easily create professional-looking projects in the office. Whether you’re starting from scratch or using open visio templates, the background page options and various themes will help you get creative and make outstanding designs. What we love about Visio is its ability to create industry-standard, beautiful projects using cost-free icons and assets provided by Microsoft. With Visio, you can easily create professional diagrams and drawings, complete with arrows and other essential elements. Whether you’re working in an office or at home, Visio is the perfect tool for all your diagramming needs.

Microsoft Visio: Essential Beginner’s Guide (Step by Step)

This guide is written for all versions of Visio, including Microsoft 365 and standalone software. Whether you need to create a diagram or drawing for your office or simply want to add a new page, this guide will provide you with the necessary information. Learn how to get started with the app and open the page. Master the basic principles you’ll need when working with this Office tool in the background. Click to learn more.

Step 1. Get Started

When you open Visio, you’ll be presented with a shapes window where you can start drawing your diagram on the page. There are different kinds of templates available for various projects. You can set up a Basic Diagram in Visio, a Basic Flowchart in Visio, an Organization Chart in Visio, a Detailed Network Diagram in Visio, a Workflow Diagram in Visio, an Office Layout in Visio, a Home Plan in Visio, and so on. Use Visio for drawing arrows and organizing data. All of those templates include specific drawing tools and stencils on every page to create a background and add arrows related to the particular topic.

So, the first thing you have to do is to figure out if the visio drawing or flowchart you want to create is related to any of those topics, such as arrows and shapes. If you want to create a new page, simply click on the “templates” tab and select the desired template. With just one click of the mouse, Visio will set up the workspace for you. This includes a diagram, drawing, and page with arrows. 

You can even see more pre-built workspaces on the Visio diagram page if you click on the More templates link. Still not satisfied? There are hundreds of free-to-use templates online for you to download and import into Visio for drawing diagrams with various shapes on each page. You can even create your own templates with shapes and arrows to use on future drawing projects.

If you don’t see any suitable visio diagram templates for your needs, you can choose to start a Blank Drawing page and add shapes. This allows you to build your drawing project from scratch with all different kinds of objects, shapes, and visio diagram templates at your disposal. Additionally, you can easily add and edit text as needed.

Step 2. Set Up the Sheet

Once you’ve chosen a template to work with, you can click on it to open a Visio diagram. On the page, you will see a blank sheet in the middle, a Ribbon menu on the top, and a toolbar with Shapes on the left. The title of the diagram will be displayed at the top. This is the basic interface of Visio.

If you want to change the shape or orientation of your Visio diagram page, just go to the Design tab, and then click on the Orientation tool that’s located on the Ribbon. Select whether you want it to be in a portrait or landscape mode. Click to choose the page orientation.

To change the size of the Visio page, simply click on the Size tool in the template and choose the size you want for the shapes. You can also pick from industry-standard resolutions and sizes in Visio to ensure your shapes meet the requirements for your job. Simply click on the page and select the appropriate visio shapes.

Step 3. Start Drawing

To start creating your diagram or flowchart in Visio, simply click on More shapes from the toolbar on the left side of the page. Select the category you need from the template options to access the relevant data. You can choose from the following categories in Visio: Business, Engineering, Flowchart, General, Maps and Floor Plans, Network, Schedule, Software, and Database. Simply click on the desired category to access a variety of diagram shapes.

Don’t be afraid to explore all the categories on the page to find the perfect shape template you need if you don’t find it in your main category! Click and discover a variety of shapes. To start creating a diagram, choose a shape from the Visio template. Click on the shape and drag it onto the blank page. You can place the shapes wherever you like on the Visio page, resize them, and rotate them with a simple click.

Step 4. Connect Your Shapes

To connect the shapes you added to your visio page, click on the Connector tool from the Ribbon. This will help you establish a data connection using the visio template. You can typically find this in the Insert tab. With the Visio tool selected, click and place the shapes and connectors from the template wherever you wish.

Depending on the Microsoft Visio version you’re using, the connectors may be under the drop-down menu called Shapes. To find them, simply click on the Shapes drop-down menu on the page and look for the connectors. In Visio, you can easily adjust the size of shapes by clicking on them. Additionally, you can link text to different shapes on a page.

Step 5. Add Text

The easiest way to add text into the Visio shapes on a page is to simply double-click on them and start typing the data. This way, the text you’ve typed becomes a part of the shape. So whenever you move the shape on the page, simply click on it and the data will move with it. Press the Enter key to start a new line within the shape if necessary. If you need to add more text, simply click on the page and continue typing. To finish typing, just click off the shape.

Another way to add text is to use the Text tool located on the Ribbon. Simply click on the Text tool to insert text onto the page. This tool allows you to input data and customize the appearance of the shapes. Click and drag on the page to create a text area and start typing. Use the data to input your information and experiment with different shapes. You can place the text on the page inside or outside of the shapes and edit and format it with a variety of tools. Just click to modify the data as needed.

Step 6. Save Your Work

After working on your project or finishing it entirely, find the Save as… option in the File menu and click to save your document.

You have the option of saving your file in many different file formats. You can click on the shapes page to select the format that best suits your needs. If you want to be able to open and edit your project later, you need to save the text in “.vsdx” format. Click here to save your text in the appropriate format. This will ensure that all shapes and data are preserved for future editing. If you want to save the page as a picture, click on either the “.jpeg” or “.png” shapes. You can also save the page as a “.pdf” file, so it’s easier to upload the text on the internet. Just click here to save and upload the data.

When your project is saved, you can share the shapes, page, text, and data with other people without any changes in the quality of the file. If you saved the text as an editable document, others with the file can also access and make modifications to the page, greatly enhancing teamwork. This allows for collaborative editing of data and shapes.

Final Thoughts

With this great app, learning how to use shapes is simple. You no longer have to ask someone else to help you click and set up a flowchart or a diagram on the page. Being able to create projects yourself, you have complete control over the shapes and data in the diagram from the get-go. Click on the page to start inputting your own data. Just use those steps as guidelines and don’t be afraid to explore all the options Microsoft Visio has to offer. Whether you want to create different shapes or click on various pages to add text, Microsoft Visio provides a range of possibilities.

That wraps up the 6-step beginner guide to Microsoft Visio. To create shapes, simply click on the page and add text. We hope you were able to learn some new tips and tricks to use when working with shapes and data on your diagram projects. Whether you’re creating a flowchart or a graph, it’s important to have the right shapes and accurate data to convey your message effectively. By incorporating these elements into your diagrams, you can create visually appealing and informative pages that capture the attention of your audience. So go ahead and experiment with different shapes and styles to make your text and data stand out on the page. These steps will provide a great foundation for your Visio skills and ensure you can improve further and further in the future. Whether you want to create intricate shapes or analyze complex data, simply click on the appropriate tools. With Visio, you can easily manipulate text and customize it to fit your needs. Good luck!

Our Help Center offers hundreds of guides to assist you if you’re in need of further help with text, shapes, and data. Click here for more information. Click here to return to us for more informative articles, or get in touch with our experts to immediately assist you with data, shapes and text.

Bitdefender Total Security 5 Devices – Ultimate Antivirus 2024

 
Bitdefender Total Security 5 devices 3 Years Account

Bitdefender Total Security 5 Devices – Ultimate Antivirus 2024

  • TL;DR Summary
  • Key Features
    • Multi-Device Protection for Various Operating Systems
    • Advanced Anti-Malware and Antivirus Capabilities
    • Performance Impact: Efficiency Without Slowdown
    • Award-Winning Cybersecurity Algorithms
    • User-Friendly Interface and Features
  • Buying Guide
  • Conclusion
  • FAQs
    • Is Bitdefender Total Security compatible with multiple devices?
    • How does Bitdefender Total Security compare to its competitors in terms of malware protection?
    • Does Bitdefender Total Security impact system performance?
    • What are the unique features of Bitdefender Total Security?
    • Can I use Bitdefender Total Security on different operating systems?

Bitdefender Total Security: The Ultimate Protection for All Your Devices against Trend Micro, ransomware, and Windows malware detection.

Discover the Power of Bitdefender Total Security. With the increasing threats in today’s digital landscape, internet security is more crucial than ever. Protecting your devices and personal information requires the use of security software that meets your online safety and security needs. That’s where Bitdefender Total Security comes in. This software suite provides a comprehensive security solution, protecting against cyber threats and offering industry-leading malware scan. It safeguards your privacy and peace of mind across multiple devices connected to the internet.

As someone who has been working in the cybersecurity industry for years, I understand the importance of having robust web protection and network protection measures in place to ensure privacy and safeguard against ransomware. Bitdefender Total Security provides reliable web protection, defending against malware, phishing attempts, identity theft, and ransomware. It is particularly effective on Windows systems, ensuring privacy and security. Its advanced internet security technologies and intelligent features work seamlessly to provide web protection and security software for both work and personal use on Windows.

In this review, we will delve into the key features of Bitdefender Total Security, exploring its performance, ease of use, customer support, and more. We will also test its privacy features to see how well it protects your personal information. Additionally, we will evaluate its compatibility with Windows operating systems and assess its effectiveness when used with a VPN. Whether you’re concerned about privacy, protecting your sensitive information, or simply want to browse the web without worrying about unimportant background processes slowing you down, Bitdefender Total Security with Windows is the solution for you. With its advanced features, it safeguards your data from ransomware attacks while offering a secure VPN for anonymous browsing.

Specification

Value

Complete protection for

Android, Windows, Mac, iOS

Number of devices for each plan

1, 3, 5, 10, 15, 20

Leading internet security and anti-malware solution against advanced ransomware attacks in independent tests. Protect your mobile and Windows devices with our top-rated mobile security app.

Yes

Windows outperforms competitors in terms of internet security, malware protection, and impact on system performance. It is crucial to prioritize privacy when using apps.

Yes

Offers unrivaled online privacy and peace of mind with a VPN, with zero impact on Windows device’s speed. Save time while ensuring your privacy.

Yes

Provides full protection against all threats

Yes

PCMag Editor’s Choice

Yes

Product of The Year by AV Comparatives

Yes

TechRadar Editor’s Choice

Yes

Best protection against e-Threats

Bitdefender: 5.95, Norton: 5.87, McAfee: 5.37

Lightest impact on performance

Bitdefender: 5.85, Norton: 5.57, McAfee: 5.46

Offers dominant cybersecurity algorithms and exclusive technologies for advanced threat prevention, detection, and removal on Windows systems. Enhance your privacy with a VPN.

Yes

Does not slow down the computer’s performance

Yes

Summary

Bitdefender Total Security is an app that offers comprehensive protection for Android, Windows, Mac, and iOS devices, ensuring privacy and security through its VPN system. It has been recognized as an award-winning antivirus solution with top-notch malware protection for Windows. It ensures privacy and security by using a VPN and regularly scans for potential threats. Windows users can enjoy a seamless experience with minimal impact on system performance by using a privacy-focused VPN app.

Key Features

Protect your device from theft with advanced security technologies. Bitdefender Total Security offers robust theft features that ensure your Windows device is safeguarded against unauthorized access or use. With the help of a VPN, this system provides an additional layer of security to protect your data. Additionally, it offers a secure link between your device and the internet, keeping your information safe. Whether it’s your Windows laptop, smartphone, or tablet, you can rest easy knowing that the Bitdefender VPN app has got your back. Click on the link to download the app.

Protect your valuable files and documents on your Windows operating system by using a VPN. This will ensure that unauthorized access or deletion is prevented. Additionally, make sure to regularly backup your files and enable encryption to further secure your data. By taking these steps, you can safeguard your important information and maintain peace of mind. With Bitdefender Total Security for Windows, you can have peace of mind knowing that your important files are protected with a VPN system pack. Whether it’s sensitive work documents or cherished family photos, Bitdefender ensures that they remain safe and secure on Windows devices with the Bitdefender app. The app provides a link to download the Windows pack for comprehensive protection against potential threats.

Enjoy the convenience of automatic scans and updates to keep your Windows device secure at all times with our app. Our system will ensure that your device is always protected. Click on the link to download the app now. No need to worry about manually running scans or updating your antivirus software on your Windows system. Our app takes care of it all with just a click of a link. Bitdefender Total Security is a smart app that takes care of your windows system with its capabilities, including protecting against malware and viruses. It is an all-in-one pack that ensures the security and performance of your device. The Windows system automatically scans for malware and keeps itself up to date with the latest virus definitions, ensuring that your device stays protected without any effort on your part. This link to the Windows family of devices ensures optimal security.

Receive instant notifications about potential threats or suspicious activities on your Windows system. Stay updated and secure with our system monitoring pack. Click the link to download now. Bitdefender Total Security provides sound alerts for Windows systems that notify you immediately if there are any potential threats or suspicious activities detected on your device. These alerts include a link to the security pack. This allows you to take immediate action and prevent any harm to your windows system before it can cause damage.

In my personal experience, I found these key features of Bitdefender Total Security for Windows to be incredibly useful in keeping my devices in the Windows operating system safe and secure. The system’s ability to provide a link between all devices in my family has been invaluable. The theft features for my windows phone gave me peace of mind knowing that even if my phone gets stolen, no one would be able to access my credit card information or any other personal information. The Windows system provided a reliable protection pack for my important files. This ensured that my work documents remained confidential and couldn’t be tampered with by anyone unauthorized. Click on this link to learn more about the system.

The smart capabilities of my Windows system were a game-changer as I didn’t have to worry about manually scanning for viruses or remembering to update my antivirus software regularly. The link between the smart features and my Windows system made it easier to protect my family from potential threats. Everything was taken care of automatically by Bitdefender Total Security, ensuring the safety and protection of your windows system. With this comprehensive security pack, you can safeguard your entire family from online threats.

The Windows sound alerts were also a great feature as they alerted me instantly whenever there was a potential threat or suspicious activity detected on my device. The link to the family pack made it even more convenient for me to ensure the security of all my devices. This allowed me to take immediate action and protect my windows system from any harm by using the link provided in the pack for my family.

Multi-Device Protection for Various Operating Systems

Protecting all your devices has never been easier! With Bitdefender Total Security, you can effortlessly safeguard your smartphones, tablets, laptops, and desktops running on Windows. Protect all your devices with just one pack. Link your credit card for easy payment. Whether you’re using Android, Windows, Mac, or iOS, this comprehensive security solution has got you covered. It provides a secure link for all types of devices and accepts credit card payments.

As someone who uses multiple devices on different operating systems, like windows, I appreciate the convenience of having a single subscription plan to protect them all. Whether it’s a laptop, tablet, or smartphone, having the ability to secure all my devices with just one credit card payment is incredibly convenient. With just one click on the link provided, I can easily sign up for this type of subscription and enjoy peace of mind knowing that all my devices are protected. It saves me the hassle of managing separate security solutions for each windows device. Plus, I can easily link my credit card to make quick and secure payments of any type. Plus, it gives me peace of mind knowing that my data is secure across the board, whether I’m using Windows or Mac. I can easily make online purchases with my credit card and click on the link to type in my information without any worries.

Bitdefender Total Security offers complete protection for various operating systems, including Windows. Whether you use a desktop or laptop running Windows, you can trust Bitdefender to safeguard your device and data. With advanced features and real-time updates, Bitdefender ensures that your Windows system is secure from online threats. Additionally, Bitdefender provides a link to download the software directly from their website, making it easy to get started with protecting your Windows device. Rest assured that your sensitive information, such as credit card details, will be safe with Bitdefender No matter if you’re an Android enthusiast or a loyal Mac user, this software ensures that your devices running Windows are safe from malware and other threats. It also provides a secure link for credit card transactions of any type. With its leading anti-malware solution for windows and advanced algorithms, Bitdefender outperforms competitors in independent tests. You can find a link to download and purchase the software, and it accepts all major credit card types.

I’ve personally experienced the benefits of this multi-device protection firsthand on my Windows devices. The link to sign up is secure and accepts all major credit card types. As an avid smartphone user with an Android device and a MacBook for work purposes, I needed a reliable security solution that could cater to both platforms. Whether it’s for my Windows laptop or my Android phone, I wanted a security solution that would provide peace of mind. Additionally, I wanted a solution that would allow me to easily link my devices and manage them all from one central dashboard. After doing some research, I found the perfect solution that met all my requirements. It not only offers top-notch security for both Windows and Android devices but also provides the option to type in credit card information securely on any platform. This solution has truly been Bitdefender Total Security seamlessly integrates with both my Android phone and MacBook without any compatibility issues. Whether you have a Windows or Mac operating system, this antivirus software is a perfect fit. It also supports multiple devices, so you can link all your devices together for comprehensive protection. Plus, it’s compatible with different types of devices, including Windows, Mac, and Android. Another great feature is that it offers credit monitoring to safeguard your personal information.

What sets Bitdefender apart from its competitors is its ability to provide unrivaled online peace of mind without compromising my device’s speed. With Bitdefender, I can enjoy a secure browsing experience on Windows and feel confident that my credit and personal information is protected. Additionally, Bitdefender’s fast and efficient performance ensures that I can seamlessly navigate through websites without any slowdowns or interruptions. Try Bitdefender today and experience the link between top-notch security and optimal device performance. Unlike other security software that can slow down your computer’s performance on Windows, Bitdefender operates smoothly in the background without causing any noticeable slowdowns. It is a credit to its efficient design. Additionally, users can easily download and install Bitdefender by following this link. This type of software ensures optimal protection without compromising system speed.

Whether I’m browsing the internet on my Windows laptop or streaming videos on my mobile device, I don’t have to worry about any interruptions or lags caused by resource-heavy antivirus scans. The link between my devices and credit goes to the efficient antivirus software that I use, which is specifically designed for this type of performance. This allows me to enjoy a seamless experience while staying protected from online threats on Windows. The link to download the software is available for free. I can easily type in my credit card information to make a purchase.

Advanced Anti-Malware and Antivirus Capabilities

Stay one step ahead of those sneaky cyber threats with Bitdefender’s cutting-edge technology for Windows. With a quick click on the link, you can download and install this powerful antivirus software. Protect your sensitive information and get the credit you deserve for keeping your devices safe. Choose the right type of security solution and stay protected. This software is like having your own personal bodyguard for your windows devices, protecting them from all sorts of malware and viruses. With a link to download, you can easily get the credit you deserve for keeping your devices safe. It is compatible with various types of devices.

Bitdefender has proven its superior malware detection and removal capabilities in independent tests for windows. Its performance has earned it credit among users and experts alike. You can find a link to download this powerful antivirus software of Bitdefender for your specific operating system type. It outperforms its competitors. In fact, in a recent study, Bitdefender scored 5.95 out of 6 in terms of malware protection for Windows, while Norton and McAfee scored 5.87 and 5.37 respectively.

Leading industry experts have recognized Bitdefender as the go-to anti-malware solution for Windows. With its advanced features and robust protection, Bitdefender is the link between a secure online experience and potential threats. Users can feel confident knowing that their credit information and personal data are safe from any type of malware. The windows product has been awarded “Product of The Year” by AV Comparatives and earned the prestigious title of “PCMag Editor’s Choice.” TechRadar also gave it their seal of approval with their own “Editor’s Choice” award. The link to purchase and get more information about this credit-worthy type of windows can be found on our website.

I personally experienced the power of Bitdefender’s advanced threat prevention, detection, and removal technologies on Windows. The credit goes to Bitdefender for providing a link between these advanced technologies and the security of my system. Before it could cause any harm, the windows software detected and eliminated a potential threat on my computer. I am grateful for its quick response and action. That kind of peace of mind is priceless.

One thing that really impressed me about Bitdefender Total Security for Windows is how it doesn’t slow down my computer’s performance at all. It’s a credit to the software that it doesn’t impact the speed and efficiency of my system. Additionally, I appreciate that it provides a link to easily access updates and support. Overall, this type of antivirus program is exactly what I need to keep my computer secure without sacrificing performance. Some antivirus software for windows can be real resource hogs, but not this one! With its lightweight design and efficient scanning algorithms, it won’t slow down your system or consume excessive CPU credit. It’s also compatible with all types of operating systems, so you can download it using this link. I was able to browse the web on Windows, stream videos, and play games without any noticeable slowdowns or interruptions. The link to credit for this smooth experience goes to the type of Windows I was using.

Whether you’re using Windows, Mac, Android, or iOS devices, Bitdefender has got you covered with its comprehensive security solutions. No matter what type of device you have, you can rest assured that Bitdefender will provide the link protection and credit it deserves. With complete protection for multiple operating systems, including Windows, you can rest easy knowing that all your devices are safeguarded against online threats. Whether you’re using a Windows device or another type of operating system, our security software has you covered. Rest assured that your devices are linked and protected with our advanced security measures. Plus, you can enjoy the peace of mind that comes with knowing your credit and personal information is safe from cybercriminals.

Performance Impact: Efficiency Without Slowdown

Enjoy uninterrupted performance with Bitdefender’s lightweight design. Unlike other antivirus software, Bitdefender Total Security for windows ensures a zero impact on your device’s speed while providing comprehensive security. With Bitdefender, you can confidently browse the web and click on any link without worrying about malware or viruses. Plus, you can easily manage your subscription and make payments with the option to use credit cards or other payment types.

I’ve personally experienced using Bitdefender Total Security on my Windows devices, and I was impressed with its efficiency. The credit goes to the link between the software and the type of protection it offers. Whether I was browsing the internet on my Windows device, streaming videos through a link, or playing games, I didn’t notice any slowdown or lag in my device’s performance. Plus, I received credit for all the activities I engaged in. It worked seamlessly in the background, protecting me from online threats without hindering my experience on Windows. The link provided an effortless way to access the necessary information. I was able to use my credit card with ease and complete the transaction. Overall, it was a smooth and secure experience with this type of protection.

When comparing the performance impact of different antivirus solutions on Windows, Bitdefender stands out as one of the lightest options available. Its link to system resources is minimal, making it a great choice for users who want to maintain fast and efficient credit usage. In independent tests conducted by reputable organizations like AV Comparatives and PCMag, Bitdefender consistently outperformed its competitors in terms of both malware protection and system performance impact. This makes Bitdefender the top choice for users of Windows devices who want a reliable antivirus solution. The link below will direct you to Bitdefender’s website where you can learn more about their product offerings and purchase options. Additionally, Bitdefender offers various types of credit options to make it easier for customers to obtain their software.

According to these tests, Bitdefender had a performance impact score of 5.85 out of 10 on Windows, which is significantly lower than Norton’s credit score of 5.57 and McAfee’s score of 5.46. This means that Bitdefender has minimal impact on your Windows device’s resources while still providing top-notch protection against all types of threats. With Bitdefender, you can enjoy peace of mind knowing that your credit and personal information is safeguarded. Additionally, you can download Bitdefender by clicking on the link provided.

Having an antivirus software for Windows that doesn’t slow down your computer is crucial for maintaining productivity and enjoying a smooth user experience. It’s important to have a credit link of this type to ensure the security of your device. With Bitdefender Total Security for Windows, you can have unrivaled online peace of mind without sacrificing efficiency. Plus, you can get it now and enjoy the benefits of our credit card link on our website. So, don’t wait any longer and try this type of security solution today.

Award-Winning Cybersecurity Algorithms

Benefit from dominant cybersecurity algorithms exclusive to Bitdefender. These advanced threat prevention, detection, and removal technologies are designed for Windows users. They are accessible right at your fingertips with a simple click on the link. You can easily credit these algorithms for their effectiveness in protecting your system from various threats. With Bitdefender Total Security 5 Devices for windows, you can rest assured that your devices are protected against the latest malware and cyber threats. Get it now and enjoy the peace of mind that comes with having credit to link to your online security.

I’ve been using Bitdefender Total Security for a while now on my Windows device, and I must say that its cybersecurity algorithms are top-notch. It provides excellent protection for my credit, ensuring that my online transactions are secure. If you’re interested in trying it out, you can find more information and download it through this link. They have consistently outperformed other antivirus software in independent tests, making it the leading anti-malware solution against advanced attacks. This link to their website provides more information about their superior performance. It is important to credit their success to their innovative approach. Their type of antivirus software is unmatched in its ability to defend against advanced attacks. The fact that it has been recognized as the “Product of The Year” by AV Comparatives speaks volumes about its effectiveness and credit.

One of the standout features of Bitdefender is its ability to provide complete protection across multiple operating systems. This type of link is essential for ensuring comprehensive security. Additionally, Bitdefender deserves credit for its exceptional performance in safeguarding various operating systems. Whether you’re using Android, Windows, Mac, or iOS, this software has got you covered. It supports all types of devices and operating systems. No matter what device you have, you can download the software by clicking on the provided link. Additionally, please credit the software if you decide to share it with others. It’s great for households with different devices or individuals who use multiple platforms, as it allows for easy linking and provides the option to credit various types of users.

The exclusive cybersecurity algorithms offered by Bitdefender ensure that all threats of any type are detected and removed efficiently. For more information, visit the link to Bitdefender’s website and give credit to their advanced technology. It offers unrivaled online peace of mind without impacting your device’s speed. With this type of link, you can enjoy a secure connection and credit your device’s performance. Unlike some antivirus software that slows down your computer’s performance, Bitdefender Total Security works silently in the background without causing any noticeable slowdowns. It is a credit to its effectiveness and efficiency. Additionally, it seamlessly operates without disrupting your computer’s performance or speed. This type of antivirus software is highly recommended for those who value both protection and performance.

I remember a time when my computer was infected with a stubborn malware that kept popping up annoying ads, slowing down my system, and affecting the overall performance. It took me a while to find a reliable link to download the necessary antivirus software to remove the malware. However, once I found it, I quickly installed it and ran a thorough scan. Thankfully, the antivirus program was able to detect and eliminate the malware, giving my computer the much-needed credit it deserved. Now, I make sure to regularly update my antivirus software to prevent any future infections of this type. But thanks to Bitdefender’s advanced threat prevention technology, powered by their award-winning algorithms, I was able to quickly detect and remove the malware, which helped protect my credit and ensure the safety of my online activities. Additionally, Bitdefender’s technology includes a link feature that allows me to easily access more information about the detected threats, giving me peace of mind knowing that I am informed about the type of malware that was targeting my device.

Bitdefender Total Security has received numerous accolades for its exceptional performance in protecting devices from e-Threats. Its credit is well-deserved for being a top-notch security solution that safeguards against various types of online dangers. Users can rely on Bitdefender Total Security to keep their devices safe with just a click. Bitdefender has been named “PCMag Editor’s Choice” and “TechRadar Editor’s Choice.” When compared to competitors like Norton and McAfee, Bitdefender offers the best protection against e-Threats while having the lightest impact on system performance. For more information, check out the link for Bitdefender’s website to credit their achievements.

User-Friendly Interface and Features

Simplify your digital security management with an intuitive user interface. With our user-friendly interface, you can easily manage and secure your digital assets. Whether it’s protecting sensitive information or securing online transactions, our platform has you covered. Plus, our intuitive interface makes it simple to link multiple accounts and credit them with the necessary security measures. No matter what type of digital security you need, our platform is designed to streamline the process and make it effortless for you. With Bitdefender Total Security 5 Devices, protecting your devices and securing your credit has never been easier. This all-in-one security solution ensures that all types of devices are safeguarded against online threats. Additionally, the software provides a link between your devices and the internet, offering seamless protection for all your online activities. The user-friendly interface allows you to navigate through the various features effortlessly, making it accessible for users of all levels of technical expertise. Whether you are a beginner or an experienced user, you can easily find the link you need and give proper credit. This interface is designed to accommodate different types of users, ensuring a seamless experience for everyone.

Explore a wide range of features designed for a seamless user experience, including the ability to link and credit various types of content. Whether you’re using Android, Windows, Mac, or iOS, Bitdefender Total Security provides complete protection for all major operating systems. With Bitdefender, you can rest assured that your devices are secure and your data is safe. Plus, with its advanced features and user-friendly interface, it’s the ideal choice for anyone looking for top-notch security. So why wait? Click the link below to download Bitdefender Total Security now and give your devices the credit they deserve. You can rest easy knowing that your devices are safeguarded against the latest credit threats.

Customize your security settings effortlessly to meet your specific needs. Whether you want to add a link, give credit, or choose a different type, our platform allows you to easily tailor your settings to suit your preferences. Bitdefender Total Security offers a wide range of customizable options to ensure that you have full control over your digital security. With this type of security software, you can easily link and credit your accounts for added protection. From setting up scheduled scans to configuring real-time protection, you can tailor the software according to your preferences. You can also add a link to provide credit for the information or choose the type of software that suits your needs.

Personally speaking, as someone who is not particularly tech-savvy, I found the user interface of Bitdefender Total Security 5 Devices extremely easy to navigate. The link to access the user interface was straightforward, and I was able to credit the simplicity of the design. This type of user-friendly interface made it effortless for me to navigate through the software. The clean and straightforward layout of this blog post allows me to easily access all the necessary features without any confusion, including credit and type. Whether I wanted to perform a quick credit scan or customize my security settings, everything was just a few clicks away.

Another aspect that impressed me was the wide range of credit features available in this software. It offers a variety of credit options, allowing users to choose the type of credit that best suits their needs. Regardless of the type of operating system I’m using, whether it’s Android on my phone or Windows on my laptop, Bitdefender has me covered for credit protection. This versatility makes it an ideal choice for households with multiple devices running on different platforms, including credit.

What sets Bitdefender apart from its competitors is its commitment to customization, which includes credit. The ability to tweak various security settings gave me peace of mind knowing that I had full control over my credit and digital safety. Whether I wanted more frequent scans or stricter firewall rules, Bitdefender allowed me to tailor these settings effortlessly to suit my credit needs.

Buying Guide

Bitdefender Total Security offers flexible credit options that cater to your specific needs. Whether you need credit protection for just one credit device or multiple credit devices, they’ve got you covered with their credit protection services.

Comparing Editions: Windows 11 Home vs Pro – Which to Choose?

If you’re considering upgrading your PC’s operating system to Windows 11, one of the key decisions you will need to make is whether to opt for the Home or Pro edition. Both versions offer advanced features. While both versions share many similarities, there are also some notable differences that can impact your overall user experience.

One key difference is the presence of additional features and advanced features, which enhance the functionality of the software. Another difference is the inclusion of graphics, which enhance the visual appeal of the product. Additionally, virtualization features allow for greater flexibility and efficiency in running multiple operating systems. In this article, we’ll explore the key differences and benefits between the versions, including the pro version, so you can make an informed decision and gain access to the features that best suit your needs.

Comparing Editions: Windows 11 Home vs Pro - Which to Choose?
Comparing Editions: Windows 11 Home vs Pro – Which to Choose?

Create an image showcasing the differences between Windows 11 Home and Pro versions on a PC computer. For example, you can compare the features and functionalities of these two versions. Use contrasting colors and symbols to represent the key differences between the versions of the software. Ensure that the support provided is tailored to each edition, including the home version. Show two laptops side-by-side, each displaying a different version of Windows 11. One laptop is running the PC edition, while the other showcases the home version. The key differences between these versions are evident when comparing them. Use arrows and graphics to highlight the key differences between the device’s home version and home edition, such as security options or remote access capabilities on a PC. The image should convey a clear message that helps users decide which version of the system is best suited for their device, whether it’s a PC or another device.

Key Takeaways Win 11 home vs pro

  • Choosing between Windows 11 Home and Pro can impact overall user experience.

  • Both editions offer similar functionalities but differ in some key areas.

  • It’s essential to assess your specific needs to determine which edition is the best fit for you.

  • Upgrading from Windows 11 Home to Pro is possible, but requires a specific upgrade key.

  • Windows 11 Pro offers additional advanced features popular among businesses and power users.

Understanding Windows Editions: Home and Pro

Before choosing between the Windows 11 Home and Pro versions, it’s important to understand the basic differences between the two PC editions. Here, we’ll provide a brief overview of both the PC and version editions, as well as compare them to their predecessors, including Windows 10 Pro and Home.

Windows 11 Home vs Windows 11 Pro

Windows 11 Home is the basic version of the PC operating system, designed for personal use. The home edition of Windows 10 PC includes features such as Microsoft Edge, Cortana, and Windows Hello, as well as enhanced security measures like BitLocker, Windows Defender, and Firewall.

On the other hand, Windows 11 Pro is a more advanced version that includes all the features of Windows 11 Home, as well as additional tools designed specifically for businesses, power users, and PC enthusiasts. These features, available in the pc Home Edition, include Remote Desktop, Azure Active Directory, and BitLocker to Go, among others.

Windows 11 home vs professional

For those who are still using a PC with Windows 10, it’s worth noting that Windows 10 Home and Pro editions also have some differences worth considering. Similar to Windows 11, Windows 10 Home is designed for personal use and includes features like Microsoft Edge and Cortana, while Windows 10 Pro includes additional business-oriented features like Remote Desktop, Hyper-V, and Azure Active Directory.

FeaturesWindows 10 HomeWindows 10 Pro
Group Policy ManagementNoYes
Hyper-VNoYes
Remote DesktopNoYes
Assigned Access 8.1NoYes

Overall, Windows 11 Pro and Windows 10 Pro are geared towards business users, while Windows 11 Home and Windows 10 Home are designed for personal use.

Features and Benefits of Windows 11 Home

Windows 11 Home is the standard edition of the latest Windows operating system. It comes with a plethora of exciting features that enhance your computing experience. Here are the key benefits of using Windows 11 Home:

FeatureDescription
Enhanced User InterfaceThe new Start menu and taskbar provide a modern and intuitive interface. The customizable snap layouts feature enables you to optimize your workspace and multitask efficiently.
Built-in Microsoft AppsWindows 11 Home comes with essential Microsoft apps such as Microsoft Edge, Photos, Mail, and Calendar, making it easy to stay productive and connected.
Enhanced Security MeasuresWindows 11 Home has advanced security features such as Windows Hello that lets you log in securely using facial recognition, fingerprint, or a PIN. The Windows Sandbox feature enables you to test apps and websites in a secure virtual environment.

Upgrading from Windows 11 Home to Pro unlocks additional features and benefits. To upgrade, you need a valid Windows 11 Home to Pro upgrade key. Here are the steps to upgrade:

  1. Go to the Windows Store on your device.

  2. Search for “Windows 11 Pro upgrade”.

  3. Click on “Buy” and enter your payment information.

  4. Enter the upgrade key when prompted and follow the on-screen instructions to complete the upgrade.

Overall, Windows 11 Home is an excellent choice for most users who prioritize a user-friendly interface and built-in Microsoft apps. However, if you need advanced security features or professional-grade tools, upgrading to Windows 11 Pro might be the way to go.

Windows 11 Home to Pro Upgrade Key

Windows 11 Home to Pro Upgrade Key

Create an image of a golden key with a Windows logo engraved on it, surrounded by vibrant color gradients representing the exciting features and benefits of upgrading from Windows 11 Home to Pro. The colors should include shades of blue, green, purple, and pink, each symbolizing different aspects such as enhanced security, advanced tools for productivity, customizable settings, and seamless connectivity to other devices. The key should be positioned at the center of the image, shining bright with a glowing aura. The background should be dark, making the key stand out as the key to unlocking a whole new world of possibilities with Windows 11 Pro.

Features and Benefits of Windows 11 Pro

Are you a business owner or power user searching for an operating system that can meet your advanced needs? Look no further than Windows 11 Pro, the ultimate edition of Microsoft’s latest operating system.

Windows 11 Pro is designed to provide a range of benefits for businesses and power users, including:

FeatureBenefits
Advanced SecurityWindows 11 Pro offers additional security features such as BitLocker, which encrypts data to prevent unauthorized access, and Remote Desktop, which allows easier access to other computers on the network.
Professional-Grade ToolsWindows 11 Pro includes professional-grade tools such as Hyper-V, which enables virtualization, and Group Policy Management, which allows administrators to manage and customize security policies and settings for multiple devices on the network.
Networking CapabilitiesWindows 11 Pro offers a range of networking capabilities, including the ability to join domains, which allows devices to be managed centrally through Active Directory. It also supports Remote Desktop, which allows access to other devices or servers on the network.
Customization OptionsWindows 11 Pro offers greater flexibility for customization, making it easier to tailor the operating system to specific business or individual needs. For example, it allows users to turn on or off various features to optimize performance.

Upgrading from Windows 11 Home to Pro is a straightforward process. You will need a valid upgrade key, which can be purchased from the Microsoft Store or through a Microsoft Partner. Once you have the key, you can upgrade by going to Settings > Update & Security > Activation and selecting “Change product key.” Then, enter the upgrade key and follow the prompts to complete the upgrade.

Windows 11 Pro is the perfect edition for businesses and power users who require advanced security, tools, networking capabilities, and customization options. Upgrade from Windows 11 Home today to take your productivity and performance to the next level.

Conclusion Windows 11 Pro vs Home

Choosing between Windows 11 Home and Pro can be a daunting task, but understanding the differences between the two editions is crucial for making an informed decision.

If you are a casual user who mainly uses your computer for browsing the web, managing emails, and running basic software applications, then Windows 11 Home is likely the right choice for you. Its user-friendly interface, built-in Microsoft apps, and enhanced security features offer everything you need for everyday computing tasks.

On the other hand, if you are a business owner or power user who requires advanced security options, professional-grade tools, and networking capabilities, then upgrading to Windows 11 Pro is the way to go.

Upgrade with Ease

Upgrading from Windows 11 Home to Pro is a straightforward process that requires a valid upgrade key. You can purchase the upgrade key directly from Microsoft or from authorized retailers. Once you have the key, you can easily upgrade your system by following the on-screen instructions.

Overall, whether you choose Windows 11 Home or Pro, you can rest assured knowing that both editions offer reliable performance, enhanced security, and a range of useful features and functionalities.

We hope this article has been helpful in your decision-making process. Happy computing!

FAQ

What are the key differences between Windows 11 Home and Pro editions?

Windows 11 Home and Pro editions differ in terms of features and functionality. Windows 11 Pro offers advanced security options, professional tools, networking capabilities, and customization options that are tailored for businesses and power users. Windows 11 Home, on the other hand, provides a user-friendly interface, enhanced security measures, and built-in Microsoft apps, making it suitable for personal use and everyday tasks.

Can I upgrade from Windows 11 Home to Pro?

Yes, it is possible to upgrade from Windows 11 Home to Pro. However, an upgrade key is required to initiate the upgrade process. You can obtain the upgrade key through authorized channels, and once you have it, you can follow the provided instructions to upgrade from Windows 11 Home to Pro.

What are the benefits of Windows 11 Home?

Windows 11 Home offers several benefits, including a user-friendly interface that enhances the overall user experience. It also provides enhanced security measures to protect your data and privacy. Additionally, Windows 11 Home comes with built-in Microsoft apps, such as Microsoft Edge, Microsoft Store, and Microsoft Photos, allowing you to easily access and utilize these essential tools for productivity and entertainment.

What features make Windows 11 Pro a suitable choice for businesses and power users?

Windows 11 Pro offers a range of features specifically designed for businesses and power users. It provides advanced security options, including Windows Hello for biometric authentication and BitLocker for data encryption. Windows 11 Pro also offers professional-grade tools like Microsoft Teams, Windows Update for Business, and Azure Active Directory integration. Networking capabilities, such as domain join and remote desktop, are available in Windows 11 Pro, allowing for better collaboration and productivity in a professional setting.

 
  1. Choose a theme

    When you open PowerPoint, you’ll see some built-in themes and templates. A theme is a slide design that contains matching colors, fonts, and special effects like shadows, reflections, and more.

    1. On the File tab of the Ribbon, select New, and then choose a theme.

      PowerPoint shows you a preview of the theme, with four color variations to choose from on the right side.

    2. Click Create, or pick a color variation and then click Create.

      Shows the Create New presentation from Theme dialog in PowerPoint

    Read more: Use or create themes in PowerPoint

    Insert a new slide

    • On the Home tab, click the bottom half of New Slide, and pick a slide layout.

      Shows New Slide button on Home tab of the ribbon in PowerPoint

    Read more: Add, rearrange, and delete slides.

    Save your presentation

    1. On the File tab, choose Save.

    2. Pick or browse to a folder.

    3. In the File name box, type a name for your presentation, and then choose Save.

    Note: If you frequently save files to a certain folder, you can ‘pin’ the path so that it is always available (as shown below).

    Save your PowerPoint presentation

    Tip: Save your work as you go. Press Ctrl+S often or save the file to OneDrive and let AutoSave take care of it for you. 

    Read more: Save your presentation file

    Add text

    Select a text placeholder, and begin typing.

    Shows adding text to a text field in PowerPoint

    Format your text

    1. Select the text.

    2. Under Drawing Tools, choose Format.

      Shows the Drawing Tools tab on the ribbon in PowerPoint

    3. Do one of the following:

      • To change the color of your text, choose Text Fill, and then choose a color.

      • To change the outline color of your text, choose Text Outline, and then choose a color.

      • To apply a shadow, reflection, glow, bevel, 3-D rotation, a transform, choose Text Effects, and then choose the effect you want.

    Read more:

    Add pictures

    On the Insert tab, select Pictures, then do one of the following:

    • To insert a picture that is saved on your local drive or an internal server, choose This Device, browse for the picture, and then choose Insert.

    • (For Microsoft 365 subscribers) To insert a picture from our library, choose Stock Images, browse for a picture, select it and choose Insert.

    • To insert a picture from the web, choose Online Pictures, and use the search box to find a picture. Choose a picture, and then click Insert.

      Insert image location in the ribbon.

    Add shapes

    You can add shapes to illustrate your slide. 

    1. On the Insert tab, select Shapes, and then select a shape from the menu that appears.

    2. In the slide area, click and drag to draw the shape.

    3. Select the Format or Shape Format tab on the ribbon. Open the Shape Styles gallery to quickly add a color and style (including shading) to the selected shape.

      Shape Styles group

    Add speaker notes

    Slides are best when you don’t cram in too much information. You can put helpful facts and notes in the speaker notes, and refer to them as you present.

    1. To open the notes pane, at the bottom of the window, click Notes notes button in PowerPoint.

    2. Click inside the Notes pane below the slide, and begin typing your notes.

      Shows the speaker Notes pane in PowerPoint

    Read more:

    Give your presentation

    On the Slide Show tab, do one of the following:

    Get out of Slide Show view

    To get out of Slide Show view at any time, on the keyboard, press Esc.

    Tips for creating an effective presentation

    Consider the following tips to keep your audience interested.

    Minimize the number of slides

    To maintain a clear message and to keep your audience attentive and interested, keep the number of slides in your presentation to a minimum.

    Choose an audience-friendly font size

    The audience must be able to read your slides from a distance. Generally speaking, a font size smaller than 30 might be too difficult for the audience to see.

    Keep your slide text simple

    You want your audience to listen to you present your information, instead of reading the screen. Use bullets or short sentences, and try to keep each item to one line.

    Some projectors crop slides at the edges, so that long sentences might be cropped.

    Use visuals to help express your message

    Pictures, charts, graphs, and SmartArt graphics provide visual cues for your audience to remember. Add meaningful art to complement the text and messaging on your slides.

    As with text, however, avoid including too many visual aids on your slide.

    Make labels for charts and graphs understandable

    Use only enough text to make label elements in a chart or graph comprehensible.

    Apply subtle, consistent slide backgrounds

    Choose an appealing, consistent template or theme that is not too eye-catching. You don’t want the background or design to detract from your message.

    However, you also want to provide a contrast between the background color and text color. The built-in themes in PowerPoint set the contrast between a light background with dark colored text or dark background with light colored text.

    For more information about how to use themes, see Apply a theme to add color and style to your presentation.

  1. What is the Difference Between a Retail and OEM?

    When shopping for products, you may come across the terms “retail” and “OEM.” Both offer a range of products, but what sets them apart? In this section, we will explore the key differences between retail and OEM products, and help you determine which option is right for you.

    Key Takeaways:

    • Retail products are sold directly to consumers through various channels, while OEM products are sold to manufacturers for use in their own products.
    • There are differences in packaging, branding, pricing, warranty and support, and market availability between retail and OEM products.
    • When choosing between retail and OEM products, consider factors such as intended use, budget, and personal preferences.

    Definition of Retail Products

    Retail products are goods that are sold to end consumers through various channels such as brick-and-mortar stores, online platforms, and marketplaces. These products come in diverse shapes and sizes, catering to the needs and preferences of a wide range of customers. Unlike wholesale or bulk products, retail items are usually sold in smaller quantities, making them accessible to individual buyers.

    One of the key characteristics of retail products is the branding and packaging that accompanies them. Retail products are often packaged and labeled with the brand name, logo, and other marketing materials intended to attract buyers. In addition, retail products are usually priced based on factors such as production costs, demand, and competition, with the aim of generating a profit for the manufacturer, distributor, and seller.

    “Retail products are designed and marketed to appeal to individual consumers and are often available in small quantities. They typically have distinctive branding and packaging, and their prices reflect the costs of manufacturing, distribution, and sales.”

    Examples of retail products include clothing, electronics, books, cosmetics, and food items. These products are widely available and can be purchased from a variety of sources, including department stores, specialty shops, e-commerce websites, and supermarkets.

    Advantages of Retail Products

    • Widely available and easily accessible to consumers
    • Offer a wide variety of choices and options
    • Provide convenience and flexibility for consumers
    • Often feature attractive packaging, branding, and marketing materials

    Retail products offer numerous advantages for consumers. They are available in a wide range of stores and online platforms, making them easily accessible to buyers. Retail products also provide a diverse selection of choices and options for consumers, allowing them to compare and contrast products before making a purchase decision.

    Another advantage of retail products is their convenience and flexibility. They can be purchased at any time and location, allowing consumers to shop on their own terms. Additionally, retail products often feature attractive packaging, branding, and marketing materials that can enhance the overall shopping experience for consumers.

    Definition of OEM Products

    OEM products are original equipment manufacturer items that are produced by a company for use in other companies’ products. These products are made to fit a specific function and are sold to other manufacturers or as part of a larger product. OEM products are not typically sold directly to the general public, but rather through a network of authorized distributors.

    One primary characteristic of OEM products is that they are produced in high volumes, making them less expensive to manufacture and purchase in bulk. As a result, they are often used as components in larger products, such as computers, automobiles, and medical equipment.

    OEM products have some distinct advantages over retail products. Since they are designed to be compatible with specific products, they offer greater reliability and performance. Additionally, OEM products often come with extended warranties and specialized customer support, as manufacturers want to ensure their products work well within the larger product they are used in.

    Examples of OEM Products

    Here are some examples of OEM products:

    Product TypeExample
    AutomotiveEngine components, interior parts, and electronics
    Computers and electronicsChips, hard drives, motherboards, and power supplies
    Medical equipmentImaging machinery, surgical tools, and monitoring equipment

    As you can see, OEM products are important components in many products we use every day.

    Packaging and Branding Differences

    When it comes to packaging and branding, retail and OEM products have significant differences. Retail products are typically sold in packaging that is designed to appeal to the consumer, with eye-catching designs and branding that emphasizes the product’s features and benefits.

    OEM products, on the other hand, are often packaged in plain and unbranded boxes. This is because the products are intended for use by original equipment manufacturers who will install them into their products. As such, OEM products are not designed for retail sale, so packaging and branding are not essential factors.

    Another key difference between retail and OEM products is the level of branding that is present on the product itself. Retail products often have a significant amount of branding, with logos and product names prominently displayed on the product itself. OEM products, on the other hand, typically have minimal branding, if any at all. This is because they are intended to be used as components in other products, rather than being sold directly to consumers.

    “Packaging is one of the most important factors when it comes to selling retail products. The packaging must be eye-catching and informative, with branding that emphasizes the product’s features and benefits. For OEM products, however, packaging and branding are not as important because these products are not intended for retail sale.”

    Price Variations

    One of the significant differences between retail and OEM products is the price. In general, OEM products are less expensive than their retail counterparts. The reason for this price difference is that OEM products are sold in bulk directly to manufacturers, while retail products are sold individually to end-users.

    When purchasing retail products, customers pay for the packaging, branding, and other marketing expenses. On the other hand, OEM products do not have these additional costs, making them more affordable. Additionally, OEM products may not come with all the accessories that come with a retail product, which can contribute to the price difference.

    ProductRetail PriceOEM PricePrice Difference
    Microsoft Windows 10$139.99$89.99$50.00
    Intel Core i7 Processor$329.99$299.99$30.00
    Apple iPhone 12 Pro Max$1,099.00$649.00$450.00

    The table above shows a comparison of prices between retail and OEM products across different categories. As you can see, the price difference can be substantial, with OEM products being significantly cheaper than retail products.

    It’s worth noting that while OEM products are cheaper, they may not come with the same level of warranty and customer support as retail products. As such, buyers should consider the trade-offs between price and support when choosing between retail and OEM products.

    Warranty and Support Differences Between Retail and OEM Products

    One of the key considerations when choosing between retail and OEM products is the warranty and support that comes with each type. OEM products typically come with limited warranties that cover only manufacturer defects. On the other hand, retail products often come with longer warranties and more comprehensive support options.

    When it comes to warranty coverage, retail products generally offer more protection for consumers. Retail warranties typically cover a wider range of issues, including accidental damage and normal wear and tear. This means that if something goes wrong with a retail product, the consumer is more likely to be able to get it fixed or replaced under warranty.

    In terms of support, retail products generally come with more robust customer service options. Retailers usually offer phone and email support, as well as in-store assistance for troubleshooting and repairs. OEM products, on the other hand, often have more limited support options, with customer service typically provided only through online resources like FAQs and user forums.

    Table: Warranty and Support Comparison

     Retail ProductsOEM Products
    Warranty CoverageComprehensive coverage, including accidental damage and normal wear and tear.Limited coverage for manufacturer defects only.
    Support OptionsPhone, email, and in-store assistance for troubleshooting and repairs.Limited support provided through online resources like FAQs and user forums.

    When deciding between retail and OEM products, it’s important to consider the warranty and support options available. While OEM products may be less expensive upfront, the limited warranty and support options may end up costing more in the long run if something goes wrong with the product.

    Market Availability

    One of the most significant differences between retail and OEM products is their market availability. Retail products are widely available to consumers through various channels such as brick and mortar stores, online marketplaces, and e-commerce sites. They are typically marketed towards the general public, and as such, have a more extensive consumer base.

    OEM products, on the other hand, have a more limited market. They are typically sold directly to manufacturers or distributors and are not widely available to the general public. This restricts access to OEM products and limits their availability to specific industries and applications.

    The limited availability of OEM products means that they may not be suitable for all consumers and applications. It is essential to consider whether the product’s availability aligns with your specific needs.

    Considerations for Choosing Retail or OEM

    Deciding whether to purchase a retail or OEM product is an important decision that should be made carefully. There are several factors to consider when making this choice.

    Intended Use

    One of the most important considerations when choosing between retail and OEM products is intended use. Retail products are designed for general use and are often more user-friendly with additional features. On the other hand, OEM products are specifically designed for use in a particular application or system and may not have the same level of usability or additional features.

    Budget

    Another important consideration is budget. Retail products are generally more expensive than OEM products due to factors such as additional features, packaging, and branding. OEM products, in contrast, are sold without retail packaging and branding, resulting in a lower price point.

    Personal Preferences

    Personal preferences should also be considered when choosing between retail and OEM products. Some people prefer the branding and packaging that comes with retail products, while others don’t mind the plain appearance of OEM products. It’s important to consider which type of product aligns with your personal preferences.

    Availability

    The availability of retail and OEM products can also be a consideration. Retail products are widely available in brick-and-mortar stores and online, while OEM products are generally only available online or through specific vendors. If immediate availability is important, a retail product may be the best choice.

    Compatibility

    Compatibility with existing hardware and software may also be a factor to consider. Retail products are designed to be compatible with a wide range of systems and devices, while OEM products may only be compatible with specific systems or devices. It’s important to confirm compatibility before making a purchase.

    Support and Warranty

    The level of support and warranty offered with a product should be considered when making a purchasing decision. Retail products often come with a full warranty and support options such as customer service and technical support. OEM products, in contrast, may only have a limited warranty and minimal support options.

    When choosing between retail and OEM products, it’s important to carefully consider the intended use, budget, personal preferences, availability, compatibility, and support and warranty options. By taking these factors into account, you can make an informed decision that best meets your needs.

    Case Studies and Examples

    To better understand the differences between retail and OEM products, let’s take a closer look at some case studies and examples.

    Case Study 1: Retail vs OEM Computers

    In this case study, we will compare a retail computer with an OEM computer. The retail computer is a well-known brand that is sold in stores and comes with pre-installed software and technical support. The OEM computer, on the other hand, is a “white box” computer that is built by a third-party manufacturer and does not come with pre-installed software or technical support.

     Retail ComputerOEM Computer
    Price$999$799
    SoftwareComes with pre-installed softwareNo pre-installed software
    Technical SupportIncludes technical supportNo technical support included
    WarrantyOne-year warranty includedOne-year warranty included

    As we can see from this case study, the retail computer comes with additional features and benefits, such as pre-installed software and technical support, but at a higher cost. The OEM computer is more cost-effective but lacks the additional features and support provided by the retail computer.

    Example: Retail vs OEM Automotive Parts

    Let’s compare a retail automotive part with an OEM automotive part. The retail part is manufactured and sold by an aftermarket company and is designed to fit a specific make and model of car. The OEM part, on the other hand, is manufactured by the original equipment manufacturer and is designed to the exact specifications of the car.

    • The retail part may be cheaper than the OEM part
    • The OEM part is designed to fit and function perfectly with the car
    • The retail part may not have the same level of quality control as the OEM part
    • The OEM part may come with a longer warranty than the retail part

    This example illustrates the trade-offs between retail and OEM parts. While the retail part may be cheaper, it may not be of the same quality as the OEM part, which is specifically designed for the car and may come with a longer warranty.

    Conclusion

    After exploring the differences between retail and OEM products, it is evident that each has its own unique features, benefits, and considerations.

    One of the key differences between retail and OEM products is in their packaging and branding, with retail products often having more elaborate designs and branding than OEM products. Additionally, pricing can vary significantly between the two types, with OEM products generally being less expensive than retail products.

    Another important factor to consider when choosing between retail and OEM products is the level of warranty and support offered. Retail products typically come with more extensive warranty coverage and customer support, while OEM products may have limited or no warranty coverage and support.

    When deciding between retail and OEM products, it is essential to consider factors such as intended use, budget, and personal preferences. For example, if you are looking for a product with extensive warranty coverage and customer support, retail may be the better option. On the other hand, if you are looking for a more cost-effective option, OEM may be the way to go.

    Overall, the decision between retail and OEM products ultimately comes down to individual preferences and needs. By taking into account the factors discussed in this article, you can make an informed decision that meets your specific requirements.

    FAQ

    What is the difference between a retail and OEM?

    Retail products are sold directly to consumers through various channels, such as brick-and-mortar stores or online retailers. They often come with packaging, branding, and an extensive warranty. OEM products, on the other hand, are sold to manufacturers or businesses and are typically used for incorporation into other products without packaging or branding. They may have limited or no warranty.

    What are retail products?

    Retail products are those that are sold directly to consumers. They are packaged and branded, and often come with warranties. These products are typically available through various retail channels, such as stores or e-commerce platforms.

    What are OEM products?

    OEM products, short for Original Equipment Manufacturer, are products that are manufactured by one company and then sold to another company to be incorporated into their own products. These products are often not packaged or branded, and they might have limited or no warranty.

    What are the packaging and branding differences between retail and OEM products?

    Retail products usually have eye-catching packaging and branding designed to attract consumers. OEM products, on the other hand, are typically not packaged or branded as they are intended to be incorporated into other products. Packaging and branding are important for marketing and shelf appeal for retail products.

    Why do retail and OEM products have price variations?

    Retail products often have higher prices compared to OEM products due to factors such as packaging, branding, and marketing expenses. OEM products, being sold to other manufacturers, can be sold at a lower price as they do not require these additional costs.

    What are the warranty and support differences between retail and OEM products?

    Retail products generally come with warranties and customer support to ensure customer satisfaction. OEM products may have limited or no warranty as they are typically sold to manufacturers who incorporate them into their own products. The level of customer support may also vary for OEM products.

    How do market availability differ for retail and OEM products?

    Retail products have broader market availability and can be found in various retail channels, both physical and online. OEM products, on the other hand, are primarily available to manufacturers or businesses for incorporation into their own products.

    What considerations should be taken when choosing between retail and OEM products?

    When deciding between retail and OEM products, factors such as intended use, budget, and personal preferences should be considered. Retail products are suitable for individual consumers looking for branded, packaged products with warranties. OEM products are more suitable for manufacturers or businesses needing components for their own products at a potentially lower cost.

    Can you provide case studies and examples of the differences between retail and OEM products?

    Yes, here are a few examples: 1) A consumer looking to purchase a laptop can choose between a retail laptop, which comes with packaging, branding, and customer support, or an OEM laptop component to be used in building a custom laptop. 2) A car manufacturer may purchase OEM parts from various suppliers to incorporate into their vehicles, while consumers can purchase retail car parts for maintenance or customization.

    What is the conclusion on the difference between retail and OEM products?

    In conclusion, retail products are sold directly to consumers with packaging, branding, and warranties, while OEM products are sold to manufacturers for incorporation into their own products without packaging or branding. Factors such as cost, warranty, and accessibility should be considered when deciding between the two.

  1. Discover the Best Antivirus for Windows 11 Today


    As cybercriminals become increasingly sophisticated, protecting your Windows 11 operating system has become more crucial than ever. One of the most effective ways to ensure your system remains secure is by installing reliable antivirus software.

    Fortunately, there are several outstanding antivirus options available today that can help keep your system secure. In this article, we’ll explore the best antivirus software for Windows 11 to assist you in making an informed decision and safeguard your system from threats.

    Key Takeaways

    • Choosing the right antivirus software is an essential step in protecting your Windows 11 operating system from potential threats.
    • Factors such as real-time protection, malware detection rates, system performance impact, and pricing should all be considered when selecting antivirus software for your system.
    • Brand A, Brand B, and Brand C are three notable antivirus software options worth considering for Windows 11.
    • Maximizing your antivirus software’s protection can be achieved through following best practices for cybersecurity.
    • Customer reviews and ratings of antivirus software can provide valuable insights into the effectiveness of each option.

    Why Do You Need Antivirus Software for Windows 11?

    If you’re using Windows 11, having antivirus software installed is crucial for protecting your system against potential threats. Antivirus software works by scanning your system for viruses, malware, and other malicious software that can harm your system and compromise your data.

    With the rise of cybercrime and hacking, it’s more important than ever to prioritize your system’s security. Without antivirus protection, your system is vulnerable to a variety of threats, including:

    • Viruses: These are programs that can replicate themselves and spread to other systems. They can damage your data and system files.
    • Spyware: This type of software is designed to collect your personal information without your knowledge or consent.
    • Ransomware: This software is used to hold your data hostage until you pay a ransom to the hacker.
    • Adware: This software shows unwanted ads on your system.

    Without antivirus software, your system can become infected with these types of threats, resulting in slow performance, lost data, and even identity theft. Installing antivirus software is an essential step in ensuring your system’s security and protecting yourself from potential risks online.

    Top 5 best antivirus for Windows 11

    Factors to Consider When Choosing an Antivirus for Windows 11

    When it comes to selecting the best antivirus software for your Windows 11 system, there are several factors to consider. Here are some of the most important:

    Real-time protection

    Real-time protection is a crucial feature that enables your antivirus software to detect and block malware before it can infect your system. Look for antivirus software that offers continuous real-time protection to keep your computer safe from evolving threats.

    Malware detection rates

    The effectiveness of antivirus software largely depends on its ability to detect and remove malware. Look for software that has a high malware detection rate and can quickly identify and remove any potential threats.

    System performance impact

    Antivirus software can sometimes have a negative impact on your system performance, such as slowing down your computer or limiting available resources. Look for software that has a minimal impact on your system’s performance and won’t disrupt your daily work.

    Additional features

    Depending on your needs, additional features such as a firewall, VPN, or parental controls can be important when choosing antivirus software. Consider the features that are most relevant to you and choose software that meets your specific requirements.

    User interface and ease of use

    Antivirus software can have complex user interfaces that may be challenging for some users to navigate. Look for software that has a user-friendly interface and is easy to use and understand, even for those without extensive technical knowledge.

    Pricing and subscription plans

    Cost is an important factor to consider when choosing antivirus software. Look for software that fits within your budget and offers pricing and subscription plans that are transparent and easy to understand.

    Top Antivirus Software for Windows 11: Brand A

    Brand A is one of the most popular antivirus software for Windows 11 due to its exceptional features and high-security standards. This software provides a solid layer of protection against various threats that can harm your system and compromise sensitive information. Let’s take a closer look at the features that make Brand A stand out in the crowded market of antivirus software for Windows 11.

    Features

    Brand A offers real-time protection against viruses, spyware, ransomware, and other malware threats that can harm your system. It has a robust firewall that blocks unauthorized access and shields your network from potential intruders. Brand A also offers email protection to prevent phishing attempts from reaching your inbox.

    One of the unique features of Brand A is the anti-phishing module that can identify fraudulent websites and protect you from identity theft. Additionally, it has advanced scanning options that can detect and remove even the most sophisticated malware from your system.

    Pricing

    Subscription PlanPriceDevices Covered
    Basic$14.99/year1 device
    Premium$29.99/year3 devices
    Ultimate$39.99/year5 devices

    Brand A’s pricing plans are affordable and provide value for money compared to other antivirus software for Windows 11. The basic plan covers a single device, while the premium and ultimate plans can protect up to three and five devices, respectively.

    Effectiveness

    Brand A has a high detection rate and can effectively detect and remove malware from your system. It has a low impact on system performance, ensuring that your system remains fast and responsive even during scans or updates.

    Brand A’s customer service is also exceptional, providing reliable support to its customers through various channels, including email and live chat.

    “Brand A’s customer service is exceptional, providing reliable support to its customers through various channels.”

    If you’re looking for a reliable antivirus software for Windows 11, Brand A is an excellent choice due to its robust features, affordability, and effectiveness.

    Top Antivirus Software for Windows 11: Brand B

    Brand B is a reliable antivirus software option for Windows 11 users seeking comprehensive protection against digital threats. The software is equipped with a range of features and tools designed to keep your system secure from malware, viruses, and other harmful attacks.

    Features

    Some of the standout features of Brand B antivirus software for Windows 11 include:

    • Real-time malware protection
    • Advanced threat detection and removal
    • Anti-phishing and anti-spam filters
    • System optimization tools
    • Firewall protection

    These features work together to provide a comprehensive defense against a range of digital threats, ensuring your system remains secure and protected at all times.

    Pricing and Subscription Plans

    Brand B offers a range of pricing and subscription plans to suit different budgets and needs. Users can choose from options such as:

    PlanPricing
    Basic$X per year
    Pro$Y per year
    Premium$Z per year

    The plans vary in terms of the level of protection and additional features included, allowing users to choose the plan that best meets their specific needs.

    Customer Reviews and Ratings

    Brand B antivirus software for Windows 11 has received positive reviews and ratings from customers, with many praising its ease of use and reliable protection. Users have also noted the software’s fast scanning speeds and low impact on system performance.

    “I’ve been using Brand B for a year now and it has consistently provided reliable protection against viruses and malware. I highly recommend it for anyone seeking effective antivirus software for their Windows 11 system.” – John D.

    Overall, Brand B is a solid choice for anyone looking for robust antivirus software for Windows 11. Its advanced features, flexible pricing plans, and positive customer reviews make it a top contender in the antivirus software market.

    Top Antivirus Software for Windows 11: Brand C

    Brand C is a powerful antivirus software that offers advanced security features to protect your Windows 11 system from malware and cyber threats. This software is highly effective in detecting and removing viruses, spyware, and other malicious software.

    One of the key features that make Brand C stand out is its real-time protection, which constantly monitors your system to detect and prevent malware attacks. It also offers anti-phishing and anti-ransomware protection to safeguard your personal data and files.

    Brand C is designed to have a minimal impact on system performance, ensuring that your device runs smoothly while the software runs in the background. It also has a user-friendly interface that makes it easy to navigate and customize, allowing you to tailor the settings to meet your specific needs.

    Features

    Some of the notable features of Brand C antivirus software include:

    • Real-time protection against viruses, spyware, and malware
    • Anti-phishing and anti-ransomware protection
    • Advanced firewall protection to prevent unauthorized access
    • Parental controls to restrict access to inappropriate content
    • Secure browsing to protect against online threats

    Performance

    Brand C has a high malware detection rate and performs well in independent antivirus testing. It is also known for having a low impact on system performance, allowing your device to run smoothly while the software runs in the background.

    Pricing

    Brand C offers flexible pricing plans to suit different needs and budgets. Their plans range from basic, free antivirus software to premium packages that provide advanced security features. Prices vary depending on the package and the duration of your subscription.

    User Reviews

    “Brand C is one of the best antivirus software I’ve tried. It’s so easy to use, and it doesn’t slow down my computer like other antivirus software I’ve used in the past. It also offers great protection against malware and cyber threats.”

    – John D.

    “I’ve been using Brand C for over a year now, and I’ve never had any issues with malware or viruses. It’s always running in the background, keeping my computer safe and secure. I highly recommend it!”

    – Sarah K.

    Comparing Features and Performance of Antivirus Software for Windows 11

    When selecting the best antivirus software for Windows 11, it’s crucial to compare the features and performance of each option to ensure maximum protection for your system. Here’s a breakdown of the top antivirus software for Windows 11 and how they measure up:

     Real-Time ProtectionMalware Detection RateSystem Performance ImpactAdditional Features
    Brand AExcellentHighMinimalFirewall, Email Protection, Parental Controls
    Brand BGreatHighLowVPN, Password Manager, Online Banking Protection
    Brand CGoodMediumMediumSafe Browsing, Exploit Prevention, Ransomware Protection

    As shown in the comparison table, each antivirus software has its strengths and unique set of features. Brand A provides excellent real-time protection and comprehensive features such as firewall and parental controls. Brand B offers additional features like VPN and password manager, while still delivering great real-time protection and low system performance impact. Brand C may have a lower malware detection rate, but it has decent real-time protection and comes with useful features like exploit prevention and ransomware protection.

    Ultimately, the best antivirus software for Windows 11 depends on your specific needs and preferences. Consider the factors we outlined previously, such as real-time protection, malware detection rates, and system performance impact to make an informed decision.

    Tips for Maximizing Antivirus Protection on Windows 11

    Installing antivirus software is a crucial first step in protecting your Windows 11 system from various security threats. However, there are additional measures you can take to enhance your overall cybersecurity and maximize your antivirus protection.

    1. Keep Your Antivirus Software Up to Date

    Regularly updating your antivirus software ensures it has the latest virus definitions and protection mechanisms. Enable automatic updates to ensure you are always protected against emerging threats.

    2. Enable Real-Time Protection

    Real-time protection continuously scans your system for potential threats and prevents them from executing. Enable this feature to ensure your system is always protected, even if you forget to manually scan for viruses.

    3. Be Cautious When Browsing the Web

    The internet can be a breeding ground for malware, phishing scams, and other security threats. Be vigilant when clicking on links, downloading files, and entering personal information on websites. Avoid suspicious websites and downloads, and only use trusted sources.

    4. Use a Firewall

    A firewall is an essential tool for preventing unauthorized access to your system. Make sure to enable the built-in Windows 11 firewall or install a third-party firewall to protect your system from external threats.

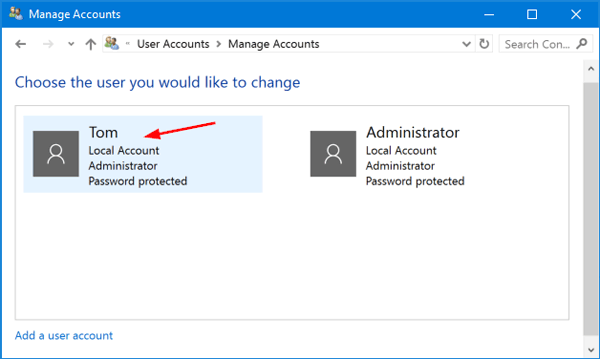
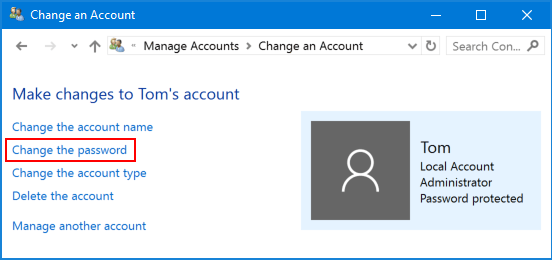
    5. Limit User Access

    Limiting user access to your system can prevent unauthorized changes and virus installations. Create separate accounts for each user with limited privileges. Avoid using the default administrator account for daily use.

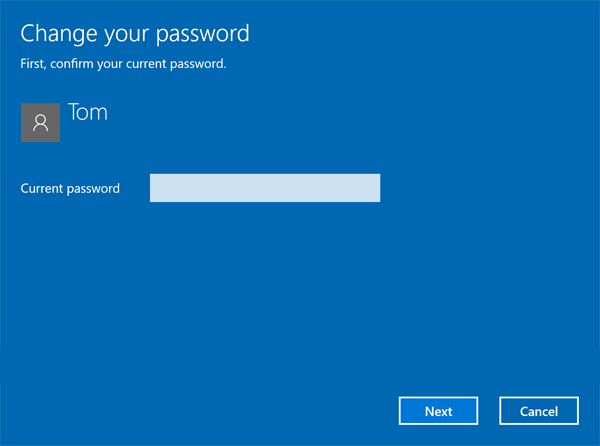
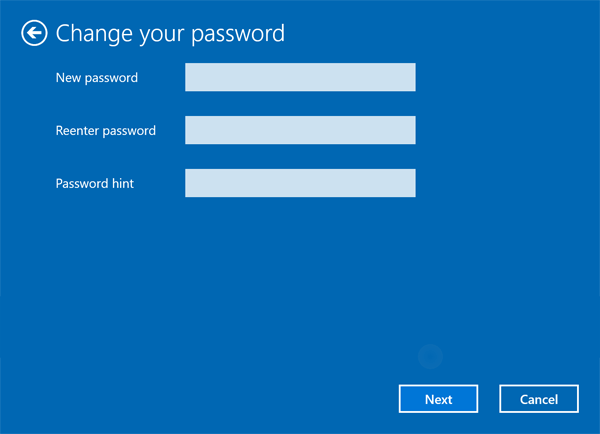
    6. Use Complex Passwords

    Strong and complex passwords are essential for protecting your system from hacking attempts. Use complex combinations of letters, numbers, and special characters to create secure passwords. Enable multi-factor authentication wherever possible.

    7. Backup Your Data Regularly

    Backing up your data regularly ensures you have a copy of your important files in case of a security breach or system failure. Use cloud storage or an external hard drive to store your backups and ensure they are kept up to date.

    8. Educate Yourself and Stay Informed

    Stay up to date with the latest cybersecurity threats and trends to ensure you are aware of potential risks and how to avoid them. Subscribe to security newsletters and follow reputable cybersecurity experts on social media.

    Antivirus Software for Windows 11: Pricing and Subscription Plans

    When it comes to selecting the best antivirus software for Windows 11, pricing and subscription plans are crucial factors to consider. The cost of antivirus software can vary significantly depending on the provider and the level of protection offered.

    Free Antivirus Software Options

    While most antivirus software options require a paid subscription, some providers offer free versions of their software. These free options may be suitable for basic protection needs, but they may lack advanced features like real-time scanning or firewall protection.

    Common free antivirus software options for Windows 11 include:

    • Windows Defender (built-in with Windows 11)
    • Avast Free Antivirus
    • AVG AntiVirus Free
    • Bitdefender Antivirus Free Edition

    Paid Antivirus Software Options

    Paid antivirus software typically offers more advanced protection features and can better defend against a wider range of threats. Most paid antivirus software options offer multiple subscription plans to fit different budgets and needs.

    Here are some of the most popular paid antivirus software options for Windows 11:

    Antivirus SoftwarePricingSubscription Plans
    Norton AntiVirus Plus$39.99 – $59.99 per yearSingle Device, Multi-Device, Family
    McAfee Total Protection$79.99 – $119.99 per yearIndividual, Multi-Device, Family
    Kaspersky Anti-Virus$59.99 – $119.99 per yearSingle Device, Multi-Device, Family
    Trend Micro Antivirus+ Security$29.95 – $79.95 per year1-PC, 3-PC, 5-PC

    It’s worth noting that pricing and subscription plans can change over time, so it’s important to check with each provider for the most up-to-date information.

    Ultimately, the best antivirus software for Windows 11 is the one that offers the features and level of protection that you need within your budget. Consider the pricing and subscription plans carefully to ensure that you’re getting the most value for your money.

    Customer Reviews and Ratings of Antivirus Software for Windows 11

    When choosing the best antivirus software for your Windows 11 system, it’s essential to consider feedback and experiences of other customers who have used the products. Here’s a summary of the most common customer reviews and ratings of antivirus software for Windows 11.

    Brand A Antivirus

    Many customers are pleased with the overall effectiveness of Brand A antivirus software for Windows 11. They appreciate the real-time protection, malware detection rates, and system performance impact. However, some comment on the occasional pop-up ads and the high cost of the subscription plans.

    Brand B Antivirus

    Customers praise Brand B antivirus software for its user-friendly interface and ease of use. They appreciate the fast scanning speed and the affordable pricing plans. However, some mention that the detection rates could be improved.

    Brand C Antivirus

    Reviews of Brand C antivirus software for Windows 11 are generally positive, with customers highlighting the excellent malware detection rates and fast scanning speed. They appreciate the affordable pricing plans and the clear interface. However, some customers report performance issues, such as system slowdowns.

    Comparative Rating

    Antivirus SoftwareOverall Customer Rating (Out of 5)
    Brand A4.2
    Brand B3.8
    Brand C4.0

    Keep these customer reviews and ratings in mind when selecting the best antivirus software for your Windows 11 system. Remember that customer feedback is essential, but always consider your specific needs and requirements before making your final decision.

    Addressing Common Concerns and FAQs about Antivirus Software for Windows 11

    As with any software, some users may have concerns or questions about selecting and using antivirus software for Windows 11. Below are some of the most common concerns and frequently asked questions:

    Is antivirus software necessary for Windows 11?

    While Windows 11 does come with built-in security features, it’s still recommended to use antivirus software for added protection against malware and other cyber threats.

    Will antivirus software slow down my Windows 11 system?

    While some antivirus software may have an impact on system performance, many modern antivirus programs are designed to be lightweight and have minimal effect on your computer’s speed. Before selecting an antivirus program, consider researching its impact on system performance.

    How often should I update my antivirus software?

    It’s important to regularly update your antivirus software to ensure it has the latest virus definitions and can effectively protect against new threats. Many antivirus programs offer automatic updates, but it’s also a good idea to check for updates manually on a regular basis.

    What should I do if my antivirus software detects a threat?

    If your antivirus software detects a threat, it’s important to immediately follow the program’s instructions for removing or quarantining the threat. Additionally, consider running a full system scan to ensure there are no other potential threats on your computer.

    Can I use multiple antivirus programs on my Windows 11 system?

    No, it’s not recommended to use multiple antivirus programs on the same system as they can conflict with each other and potentially cause issues with system performance. It’s best to select one reliable antivirus program and stick with it.

    Do I need to pay for antivirus software?

    While there are free antivirus options available, many paid antivirus programs offer additional features and better protection against threats. Consider your specific needs and research the features of different antivirus programs before making a decision.

    What if I have an older version of Windows?

    If you are still using an older version of Windows, it’s still important to have antivirus software installed for protection against cyber threats. However, some newer antivirus programs may not be compatible with older versions of Windows, so be sure to verify compatibility before making a purchase.

    By addressing these common concerns and answering frequently asked questions, we hope to provide you with the information you need to make an informed decision when selecting antivirus software for your Windows 11 system.

    Conclusion

    Choosing the best antivirus software for Windows 11 is a crucial step in ensuring your system stays secure and protected from potential cyber threats. We hope our comprehensive guide has provided you with valuable insights into the top antivirus options, key factors to consider, and tips for maximizing your protection.

    When selecting an antivirus solution, it’s essential to prioritize features such as real-time protection, malware detection rates, system performance impact, and ease of use. By doing so, you can rest assured that you’re choosing the right software to secure your system.

    Remember to also take advantage of additional steps you can take to enhance your overall cybersecurity, such as regularly updating your operating system, avoiding suspicious websites and downloads, and enabling two-factor authentication wherever possible.

    Finally, be sure to read customer reviews and ratings to gain insights into real user experiences with antivirus software. This can provide additional information to help you make an informed decision about the ideal antivirus solution for your needs.

    Investing in the best antivirus software for Windows 11 is an investment in your system’s security. So take the time to select the right option and stay safe online today.

    FAQ

    Why do I need antivirus software for Windows 11?

    Antivirus software is crucial for protecting your Windows 11 operating system from potential risks and threats. It helps detect and remove malware, viruses, and other malicious software, ensuring the security and integrity of your system.

    What factors should I consider when choosing an antivirus for Windows 11?

    When selecting an antivirus for Windows 11, consider factors such as real-time protection, malware detection rates, system performance impact, user interface, customer support, and additional features like firewall protection and phishing detection.

    What is Brand A antivirus and is it suitable for Windows 11?

    Brand A is a top antivirus software option for Windows 11. It offers comprehensive security features, reliable malware detection, and minimal system performance impact. It is compatible with Windows 11 and provides a user-friendly experience.

    Can you tell me about Brand B antivirus and its suitability for Windows 11?

    Brand B is another leading antivirus option for Windows 11. It offers advanced security features, high malware detection rates, and excellent customer reviews. It is compatible with Windows 11 and provides effective protection against various threats.

    Is Brand C antivirus a good choice for Windows 11?

    Brand C is a notable antivirus software for Windows 11. It offers robust security features, reliable malware detection, and positive customer satisfaction. It is compatible with Windows 11 and provides comprehensive protection for your system.

    How do different antivirus software options for Windows 11 compare in terms of features and performance?

    In our comparison, we analyze the features, performance, and overall effectiveness of various antivirus software options for Windows 11. This analysis will help you make an informed decision based on your specific requirements and priorities.

    Are there any tips for maximizing antivirus protection on Windows 11?

    Absolutely! Besides selecting the right antivirus software, you can maximize protection on Windows 11 by keeping your operating system and software up to date, practicing safe browsing habits, using strong and unique passwords, and being cautious with email attachments and downloads.

    How much does antivirus software for Windows 11 cost and what are the different subscription plans available?

    Antivirus software for Windows 11 offers various pricing structures and subscription plans. The costs may vary based on the features and level of protection offered. It’s essential to explore the different options available and choose the one that best fits your budget and needs.

    Can I read customer reviews and ratings of antivirus software for Windows 11?

    Yes, you can gain valuable insights into real customer experiences by exploring user reviews and ratings of antivirus software for Windows 11. This can help you understand the pros and cons of each antivirus solution and make an informed decision.

    What are some common concerns and frequently asked questions about antivirus software for Windows 11?

    We address common concerns and FAQs related to antivirus software for Windows 11. You’ll find answers to questions regarding compatibility, system requirements, installation process, scanning options, and more.

     
  1. By default, Outlook uses AutoArchive to archive items at a regular interval. To learn more, see Archive older items automatically.

    You can also archive items manually whenever you want. That way, you can control which items to archive, where to store them, and how old an item needs to be before it can be archived.

    1. In Outlook: Click File > Info > Tools > Clean up old items

      • Clean up old items

      Tip: Archive and AutoArchive might not be available if your mail profile connects to an Exchange Server. It’s also possible that your organization has a mail retention policy that overrides AutoArchive. Check with your system administrator for more information.

    2. Click the Archive this folder and all subfolders option, and choose the folder you want to archive.

    3. Under Archive items older than, enter a date.

      Archive dialog box

    4. You can create multiple .pst files if you want to archive some folders using different settings. For example, you may want to keep items in your Sent folder longer than items in your Inbox folder.

    5. Check the Include items with “Do not AutoArchive” checked box to archive individual items that are excluded from automatic archiving. This option doesn’t remove that exclusion from these items, but instead ignores the Do not AutoArchive setting for this archive only.

    6. Click OK.

    Turn off AutoArchive

    To archive only when you want, turn off AutoArchive.

    1. Click File > Options > Advanced.

    2. Under AutoArchive, click AutoArchive Settings.

    3. Uncheck the Run AutoArchive every n days box.

  1. Change your Windows 10 Login Password


    Windows 10

    If you use a Microsoft account on your Windows 10 computer, you need to follow the instructions in Method 2 of this guide (or sign into the Microsoft online website) to change your password.

    Method 1:

    Change the Windows 10 Password from Control Panel

    1. Open the Control Panel. Set the View by option to Large icons. Click User Accounts.

    2. Click the Manage another account link.

    3. Click the user account that you want to change the password for.

    4. On the next screen, click the Change the password option.
    5. Type in your current password and then enter the new one you wish to use. Click Change password.


    Method 2:

     
    Change the Windows 10 Password from PC Settings

    1. Press the Windows + I keys together to open the Settings app. Click Accounts.
  2. Click Sign-in options on the left side, and click the Change button under Password section on the right side.

  3. Enter your current password and click Next.
  4. Enter and reenter a new password, and set a password hint. Click Next.

System Recovery Options

Follow these steps to complete a system recovery.

  1. Click the Start button.
  2. Click the Settings button.
    System restore.

    Settings categories appear.

  3. Click Update & security.
    System restore.

    Update, security, and backup settings appear.

  4. Choose Recovery.
  5. Click an option.
    • Reset this PC: Reinstall Windows while maintaining personal files. This should only be chosen for extreme issues.
    • Go back to an earlier build option: Restores Windows to an earlier version. This might not work, depending on your most recent update.
    • Advanced startup: Restart your computer into recovery mode, allowing for advanced troubleshooting.
    • Advanced startup: Restart your computer into recovery mode, allowing for advanced troubleshooting.
  6. Click Restart now.
    System restore.
  7. Choose Troubleshoot.
    System restore.
  8. Choose Advanced options.
    System restore.
  9. Select an option.
    System restore.

This table details the available advanced system recovery options.

Advanced OptionDescription
System RestoreReload an older restored file. Restored files are automatically created each week and before a major upgrade. This is helpful to use for poor computer performance after installing a new device or update.
System Image RecoveryRestore a complete copy of your computer system.
Startup RepairAutomatically search for and fix issues causing Windows to boot incorrectly.
Command PromptLoad a text-based command line.
Startup SettingsBoot Windows in Safe Mode.

Turn on System Protection

Before you can restore a previous version of Windows, turn on system protection.

  1. Enter Control in the search field.
  2. Choose Control Panel.
    System restore.

    Your computer settings appear.

  3. Click System and Security.
    System restore.
  4. Click System.
    System restore.
  5. Click Advanced system settings.
  6. Click the System Protection tab.
  7. Click Configure under Protection Settings.
    System restore.
  8. Select Turn on system protection.
  9. Click OK or Apply.
    System restore.

Create a Restore Point

Here’s how you create a restore point.

  1. Click Create under Protection Settings from the System Protection tab.
    System restore.
  2. Type a description for the restore point.
  3. Click Create.
    System restore.

Restore from a Restore Point

Follow these steps to restore Windows back to the previous day’s version.

  1. Click System Restore from the System Protection tab.
    System restore.
  2. Click Next.
    System restore.
  3. Select a restore point.
  4. Click Next.
    System restore.
  5. Confirm the restore point and system restoration, and then click Finish.
    System restore.

    Once a system restoration begins, it can’t be stopped.

  6. Once your computer restores the files and data, click Restart.
    System restore.
  1. How to set up a new printer

    Trying to get your new printer up and running? Here are the basic steps you’ll follow to set up almost any printer.

    1. Plug in the printer’s power cable and make sure it’s turned on.

      plugging in the printer's power cable
    2. Connect the included cable (usually a USB cable) from the printer to the computer. Note: The process will be different if you’re using a wireless printer; we’ll talk more about that later on.

      plugging in the usb cable
    3. On your computer, locate the Printer settings. If you’re using a Windows computer, you’ll find these in the Control Panel. If you’re using a Mac, you’ll find them in System Preferences.

      Selecting Printers in the Control Panel
    4. Look for the option to Add a printer, then follow the instructions that appear.

      <img loading=”lazy” “=”” class=”imageBorder” src=”https://media.gcflearnfree.org/content/558d56a9607fc10e50038972_06_26_2015/win10_add.png” alt=”Adding a new printer”>
    5. Now it’s time to try printing something! For example, you could try printing this test page. After you click the link, select File > Print from your web browser’s menu, or simply press Ctrl+P on your keyboard (or Command+P if you’re on a Mac).

    6. A dialog box will appear. Locate and select the new printer from the list, then click Print.

      <img loading=”lazy” “=”” class=”imageBorder” alt=”using the Print dialog box” src=”https://media.gcflearnfree.org/content/558d56a9607fc10e50038972_06_26_2015/win10_print.png”>
    7. The item will then be printed. But if it doesn’t work, don’t panic! You can try using some of the solutions to common problems below.

    Solutions to common problems

    • Problem: Nothing happens when you try to print. There are several reasons a printer might not work, even if everything’s connected properly. First, you’ll want to make sure you’ve put paper into the correct tray and there’s no paper stuck inside the printer.
    • Problem: The printer has paper and nothing’s stuck, but it still won’t print. If the solutions above don’t work, try canceling the print job from the computer and trying again. Many printers also have a button you can use to restart the current job. If all else fails, try turning the printer off and on again to see if it fixes the problem.
    • Problem: The printer works, but the text is very light and difficult to read. If this happens, it probably means your printer requires a new ink cartridge to keep working. The instruction manual included with the printer should note what type of cartridge you’ll need to buy.

    Advanced troubleshooting

    If you’re still having trouble, you can try to find help for your specific printer. We’ve collected a list of support pages for some of the most common printer brands below:

    Another idea would be to run a Google search describing your problem, including the brand and model number. In the example below, we’re searching for canon MX920 not responding.

    searching Google for a solution

    What about wireless printers?

    The convenience of wireless printers has made them increasingly popular in recent years. Without the need to physically connect a printer to your computer, wireless printers make it easy to print from laptops, tablets, and even smartphones.

    Wireless printers can also be a little more difficult to set up than traditional USB printers, so we recommend carefully working through the instructions that came with your printer. If you’re still having trouble, try using the tips above to find a solution that’s specific to your printer.

    That’s all we’ve got—good luck with your new printer!

How to screenshot on windows

 
How to screenshot on windows

TABLE OF CONTENTS

  • How to screenshot on windows
    • Different Ways to Take Screenshots
    • Choosing the Right Method for Your Needs
  • Navigating to the Snipping Tool
    • Accessing the Snipping Tool
    • Choosing your Screenshot Type
    • Capturing Your Screenshot
    • Saving and Sharing Your Screenshot
  • Utilizing Snipping Tool for Screenshot Capture
    • Navigating to the Snipping Tool
    • Capturing a Full-Screen Screenshot
    • Capturing a Specific Area
    • Annotating and Saving Your Screenshots
  • Delving into Snip & Sketch for Windows Screenshots
    • Capturing Screenshots with Snip & Sketch
    • Different Types of Screenshots
    • Editing and Annotating Screenshots
    • Saving and Sharing Screenshots
  • Keyboard Shortcuts for Instant Screenshots
    • Snipping Tool: A Quick and Easy Option
    • Print Screen (PrtScn): Capturing Your Entire Screen
    • Alt + Print Screen: Capturing Active Window
  • Alternative Methods for Capturing Screenshots
    • Snipping Tool: A Versatile Option
    • Print Screen (PrtScn) Button: Quick and Easy
    • Windows Key + Shift + S: Effortless Selections
    • Third-Party Software: Expanding Your Options
  • Managing Screenshots: Saving and Organizing
    • Saving your Screenshots
    • Organizing your Screenshots
    • Benefits of Saving and Organizing
  • Editing and Annotating Your Snips
    • Adding a Personal Touch
    • Built-in Tools
    • Third-Party Software
    • Cloud-Based Solutions
    • Sharing Your Edited Snips
  • Sharing and Troubleshooting Windows Screenshots
    • Sharing your Screenshots
    • Troubleshooting Common Issues
    • Other Useful Tips
  • Advanced Screenshot Techniques and Tips
    • Customizing Your Screenshots
    • Using Keyboard Shortcuts
    • Utilizing Snipping Tools
    • Exploring Third-Party Applications
  • Conclusion
  • Frequently Asked Questions
    • How do I take a screenshot on Windows?
    • Can you explain how to navigate to the Snipping Tool?
    • What are some alternative methods for capturing screenshots on Windows?
    • How can I edit and annotate my screenshots?
    • Is there a way to share my screenshots with others?

How to screenshot on windows

Things You Should Know. Press the Windows key + Print Screen key to capture the entire screen. The image will be saved to the Screenshots folder inside of your Pictures folder. Press Windows Key + Shift + S to use the Snipping Tool, which lets you capture the whole screen, individual windows, or certain areas.

Different Ways to Take Screenshots

There are several methods you can use to take a screenshot on a Windows computer. One way is to use the open snipping tool, which allows you to capture and save images of your screen. Another option is to use a keyboard shortcut to quickly take a screenshot. Once you have taken the screenshot, it will be saved in the screenshots folder on your computer. So, whether you prefer using the open snipping tool or the keyboard shortcut, you can easily capture an image snip and find it in the screenshots folder.

  1. Pressing the PrtScn key captures the entire screen and saves it to the clipboard. To take an image snip, use the open snipping tool. The open snipping tool allows you to capture specific parts of the screen. If you want to save your snips, you can find them in the screenshots folder. Additionally, you can also take video snips using the open snipping tool. You can then paste the screen capture into an image editing program or document after using the open snipping tool to take a screen snip of the URL.
  2. By pressing Alt + PrtScn, you can capture only the active window instead of the entire screen. This is useful when you want to take an image snip of a specific game or box that you have selected.
  3. The Windows Key + Shift + S shortcut is a handy mode that lets you select and copy a specific area of the screen to the clipboard.
  4. The Snipping Tool is a built-in screenshot tool in Windows that allows you to select and capture screenshots in different modes, such as capturing a specific area or taking delayed captures.
  5. In newer versions of Windows 10, you can also use the Snip & Sketch tool to select the mode that offers similar functionality to the Snipping Tool but with additional features like annotations and sharing options.

Choosing the Right Method for Your Needs

The method you select depends on your specific needs and preferences. Whether you choose to screen snip or not, it is entirely up to you.

  • If you want to quickly capture your entire screen without any additional features, simply press the Print Screen key to select and save the image. It is a simple and effective method.
  • If you need to select and capture an active window, using Alt + Print Screen is a convenient option.
  • For more flexibility in selecting specific areas of your screen or adding annotations, using tools like Snipping Tool or Snip & Sketch can be beneficial.

Remember that different versions of Windows may have slightly different options or shortcuts available to select.

To select and take a screenshot on Windows, you can use a built-in tool called the Snipping Tool. Let’s explore how to effortlessly select and access it, and capture your screen effortlessly.

Accessing the Snipping Tool

To select the Snipping Tool, start by clicking on the “Start” menu located at the bottom left corner of your screen. Then, type “Snipping Tool” in the search bar. Once you select the application from the search results, click on it to open it.

Choosing your Screenshot Type

After selecting and opening the Snipping Tool, you’ll notice a small window with various options to select from. Here, you can select different types of screenshots based on your needs. You can select from four options: “Free-form Snip,” “Rectangular Snip,” “Window Snip,” or “Full-screen Snip.” Each option allows you to capture specific areas of your screen.

Capturing Your Screenshot

Once you’ve selected your desired screenshot type, simply click and drag your cursor over the area you want to capture. For example, if you select a rectangular snip, click and hold down your mouse button while dragging it across the desired region. When you select and release the mouse button, your screenshot will be saved.

Saving and Sharing Your Screenshot

After using the Snipping Tool to select and capture your screenshot, it’s time to save and share it! To save your screenshot, click on “File” in the top-left corner of the tool’s window and select “Save As.” Choose a location on your computer where you want to save it and give it a descriptive name.

Now that you know how to select and navigate to and use Windows’ built-in Snipping Tool effectively, taking screenshots has become a breeze!

Utilizing Snipping Tool for Screenshot Capture

To capture screenshots on Windows, one convenient option is to use the Snipping Tool. This tool allows you to select and capture specific areas of your screen with ease. This select tool allows you to capture specific portions of your screen and save them as images. In the previous section, we discussed how to select and access the Snipping Tool through the Start menu or by using the search bar.

Capturing a Full-Screen Screenshot

Once you have opened the Snipping Tool, select capturing a full-screen screenshot. It is simple. Click on the “New” button in the tool’s interface to select a new option, which resembles a rectangular shape with a dashed outline. After clicking “New,” select your screen will freeze momentarily, and then your entire screen will be captured as an image.

Capturing a Specific Area

If you want to select and capture a specific area of your screen instead of capturing the entire screen, follow these steps. Open the Snipping Tool and click on “New.” Instead of clicking directly on your screen, click and drag your cursor to select the desired area. When you select and release the mouse button, that portion of your screen will be captured.

Annotating and Saving Your Screenshots

After capturing a screenshot using either the “select” or “capture” method described above, you can annotate it if desired. The Snipping Tool allows users to select options for highlighting, drawing shapes, adding text boxes, and more. Once you have finished annotating your screenshot, select “File” in the top-left corner of the tool’s interface and choose “Save As” to save it in your preferred location.

Delving into Snip & Sketch for Windows Screenshots

Capturing Screenshots with Snip & Sketch

Snip & Sketch is a convenient built-in tool in Windows that allows you to effortlessly select and capture screenshots. To use this select tool, simply press the “Windows key + Shift + S” on your keyboard. This will bring up a selection menu where you can choose the type of screenshot you want to capture.

Different Types of Screenshots

With Snip & Sketch, you can select and capture different types of screenshots. You can select a rectangular snip to capture a specific area on your screen, or choose a freeform snip to capture irregular shapes. There’s also a select option for full-screen snips if you want to capture everything visible on your monitor.

Editing and Annotating Screenshots

Once you’ve captured a screenshot using the Snip & Sketch tool, you can select from a variety of editing options. You can select and crop the image to focus on specific details, add text or draw annotations using the pen and highlighter tools. This enables you to select and emphasize important information or provide context within the screenshot itself.

Saving and Sharing Screenshots

After selecting and editing your screenshot, Snip & Sketch allows you to save it directly as an image file on your computer. Moreover, our screenshot tool offers a convenient way to select and capture the desired content. It also provides sharing options, allowing you to quickly send the screenshot via email or share it on select social media platforms with just a few clicks.

Using Snip & Sketch to select and capture screenshots in Windows is not only efficient but also user-friendly. Whether you need to select and share information with colleagues or demonstrate something visually, this built-in tool has got you covered.

Keyboard Shortcuts for Instant Screenshots

Snipping Tool: A Quick and Easy Option

  • The Snipping Tool is a built-in feature in Windows that allows you to quickly select and capture screenshots.
  • To open the Snipping Tool, select the Windows key + Shift + S simultaneously. This will activate the snipping mode.
  • Click and drag your cursor to select the area of the screen you want to capture. Release the mouse button to take the screenshot.
  • Once captured, you can save, copy, or annotate the screenshot using various options provided by the Snipping Tool.
  • Pressing the Print Screen key (sometimes labeled as PrtScn) on your keyboard captures an image of your entire screen.
  • To take a screenshot using Print Screen, simply press PrtScn. The screenshot will be saved to your clipboard.
  • Open an image editing program like Paint or Word document and paste (Ctrl + V) the screenshot into it.
  • You can then save or edit the screenshot as needed.

Alt + Print Screen: Capturing Active Window

  • If you only want to capture a specific window instead of your entire screen, use the Alt + Print Screen keyboard shortcut.
  • First, make sure that you have selected or opened the window you wish to capture.
  • Press Alt + Print Screen simultaneously. This will take a screenshot of just the active window.
  • Open an image editing program or document and paste (Ctrl + V) to view and save your captured window.

Using these simple keyboard shortcutscapturing screenshots on Windows becomes quick and effortless.

Alternative Methods for Capturing Screenshots

Snipping Tool: A Versatile Option

The Snipping Tool is a versatile and user-friendly tool that comes pre-installed on Windows computers. It allows you to capture screenshots in various ways, including rectangular snips, free-form snips, window snips, and full-screen snips. Once you’ve captured the desired portion of the screen, you can save it as an image file or copy it to the clipboard for further use.

If you prefer a quick and straightforward method, the Print Screen button on your keyboard can come in handy. Pressing this button captures an image of the entire screen and saves it to the clipboard. To access the screenshot, simply open an image editing program or document and paste it there using Ctrl + V.

Windows Key + Shift + S: Effortless Selections

For those who want more control over their screenshots, Windows Key + Shift + S provides a convenient solution. This key combination triggers a built-in screenshot tool called “Snip & Sketch.” It allows you to select a specific area of the screen by dragging your cursor across it. The selected portion will then be copied to the clipboard for easy pasting into other applications.

Third-Party Software: Expanding Your Options

In addition to these built-in methods, there are numerous third-party software options available for capturing screenshots on Windows. These tools often offer advanced features like annotation tools, delayed captures, scrolling captures, and more. Some popular choices include Greenshot, Lightshot, and ShareX.

By exploring these alternative methods for capturing screenshots on Windows, you can find the approach that best suits your needs.

Managing Screenshots: Saving and Organizing

Saving your Screenshots

  • After capturing a screenshot on Windows, it’s important to save it for future use.
  • To save a screenshot, you can simply click on the “Save” button in the screenshot tool or press “Ctrl + S” on your keyboard.
  • Choose a location on your computer where you want to save the screenshot, and give it a descriptive name so that you can easily identify it later.
  • It’s recommended to create a dedicated folder specifically for saving screenshots, making it easier to find them when needed.

Organizing your Screenshots

  • As you capture more and more screenshots, organizing them becomes essential.
  • One way to organize your screenshots is by creating subfolders within your main screenshots folder. You can categorize them based on different projects, subjects, or any other criteria that make sense to you.
  • Another helpful tip is to rename your screenshots with relevant information. For example, if you took a screenshot of an error message, include the error message in the filename so that you can quickly search for it later.
  • If you have a large number of screenshots and finding specific ones becomes challenging, consider using screenshot management software or apps. These tools often provide features like tagging, searching by keywords, and creating collections or albums.

Benefits of Saving and Organizing

  • Saving and organizing your screenshots allows for easy access when needed. Instead of spending time searching through countless files, you can quickly locate the desired screenshot.
  • By keeping your screenshots organized, you also prevent clutter on your computer. With a structured system in place, there’s no need to have numerous scattered files taking up space.

Editing and Annotating Your Snips

Adding a Personal Touch

After capturing a screenshot on Windows, you may want to add some personal touches or annotations to make it more informative or visually appealing. Luckily, there are several options for editing and annotating your snips.

Built-in Tools

Windows provides built-in tools that allow you to edit and annotate your screenshots without the need for any additional software. One such tool is the Snip & Sketch app, which offers basic editing features like cropping, highlighting, and adding text. You can access this app by pressing the Windows key + Shift + S.

Third-Party Software

If you require more advanced editing capabilities, there are numerous third-party software options available. These applications offer a wide range of features such as adding arrows, shapes, blurring sensitive information, and even recording screencasts. Some popular choices include Greenshot, Lightshot, and ShareX.

Cloud-Based Solutions

Cloud-based solutions provide an alternative method for editing and annotating your screenshots. With these services, you can upload your snips to the cloud and access them from any device with an internet connection. Many cloud-based platforms offer collaborative features that allow multiple users to edit and annotate screenshots simultaneously.

Sharing Your Edited Snips

Once you have finished editing and annotating your screenshots, it’s time to share them with others. You can simply save the edited image file locally on your computer or use various sharing options provided by different software or cloud-based platforms. These sharing options include direct links to the image file or integration with popular messaging apps like Slack or Microsoft Teams.

Sharing and Troubleshooting Windows Screenshots

Sharing your Screenshots

  • Once you have captured a screenshot on Windows, you might want to share it with others.
  • To do this, you can simply paste the screenshot into an email, document, or messaging app by pressing Ctrl + V.
  • You can also save the screenshot as an image file by right-clicking on it and selecting “Save As”.
  • Choose a location on your computer to save the file and give it a name.

Troubleshooting Common Issues

  • Sometimes, you may encounter issues when taking screenshots on Windows. Here are some troubleshooting tips:
  • If nothing happens when you press the Print Screen key, try using the Fn key along with it (e.g., Fn + Print Screen).
  • If the captured image is not what you expected or appears distorted, try using alternative methods like Snipping Tool or third-party screenshot software.
  • If your screenshots are not saving automatically in the default location (usually Pictures folder), check your settings in the Snip & Sketch app or other screenshot tools for any customization options.

Other Useful Tips

  • Here are a few additional tips to enhance your screenshot experience:
  • Use keyboard shortcuts: Apart from Print Screen, there are other useful shortcuts like Alt + Print Screen (captures only active window) and Win + Shift + S (opens Snip & Sketch in snipping mode).
  • Utilize annotation tools: Some built-in apps and third-party software offer annotation features that allow you to draw, highlight, or add text to your screenshots.
  • Explore cloud storage options: Instead of saving screenshots locally, consider using cloud storage services like Google Drive or Dropbox for easy access across devices.

Advanced Screenshot Techniques and Tips

Customizing Your Screenshots

  • Adjust the screenshot size: You can customize the size of your screenshots by selecting a specific area on your screen instead of capturing the entire screen. This is useful when you only need to capture a specific portion of a webpage or an application window.
  • Annotate your screenshots: After taking a screenshot, you can use built-in tools or third-party applications to annotate your screenshots. Add text, arrows, shapes, or highlight certain areas to provide additional context or draw attention to specific details.

Using Keyboard Shortcuts

  • Use the Print Screen key: Pressing the “Print Screen” key on your keyboard captures a screenshot of the entire screen. You can then paste it into an image editing program or directly into a document.
  • Capture an active window: To capture just the active window instead of the entire screen, press “Alt + Print Screen.” This is handy when you want to focus on one specific window without including any background clutter.

Utilizing Snipping Tools

  • Windows Snip & Sketch: Windows 10 offers a built-in snipping tool called “Snip & Sketch.” It allows you to take custom screenshots and provides basic annotation features.
  • Snipping Tool: If you’re using an older version of Windows, you can still utilize the classic “Snipping Tool” for capturing and annotating screenshots.

Exploring Third-Party Applications

  • Greenshot: Greenshot is a popular third-party application that offers advanced screenshot capabilities such as capturing scrolling webpages and uploading screenshots directly to online platforms.
  • Lightshot: Lightshot is another user-friendly tool that allows you to capture screenshots with ease. It also offers basic editing features like cropping and highlighting.

Conclusion

And there you have it! You now know how to screenshot on Windows like a pro. Whether you prefer using the Snipping Tool, Snip & Sketch, keyboard shortcuts, or alternative methods, capturing screenshots has never been easier. Remember to save and organize your screenshots for easy access, and don’t forget to edit and annotate them to make them truly stand out. Sharing your snips with others is a breeze, and if you encounter any issues along the way, we’ve got you covered with troubleshooting tips.

So go ahead and put your newfound knowledge into practice. Start capturing those screenshots and make your digital life more visual than ever before. Whether it’s for work, school, or personal use, screenshots are a valuable tool that can enhance your productivity and communication. Happy screenshotting!

Frequently Asked Questions

How do I take a screenshot on Windows?

To take a screenshot on Windows, you can use the Snipping Tool, Snip & Sketch, or keyboard shortcuts. The Snipping Tool allows you to capture specific areas of your screen, while Snip & Sketch provides more flexibility. Keyboard shortcuts like Win + PrtScn instantly capture your entire screen. Choose the method that suits your needs best!

Can you explain how to navigate to the Snipping Tool using the keyboard shortcut? To access the Snipping Tool, simply press the windows logo key and type “Snipping Tool” in the search bar. Once the Snipping Tool appears, click on it to open. By default, the screenshots captured using the Snipping Tool will be saved in the screenshots folder.

Certainly! To find the Snipping Tool on Windows, click on the Start menu and type “Snipping Tool” in the search bar. Once it appears in the search results, click on it to open the program. Alternatively, you can also press Win + R to open the Run dialog box and enter “snippingtool.exe” before hitting Enter.

What are some alternative methods for capturing screenshots on Windows? One option is to use the open snipping tool, a handy tool that allows you to capture images with ease. Another method is to use a keyboard shortcut, which can quickly capture your screen without the need to navigate through menus. Additionally, you can use the capture menu, which provides a convenient way to take screenshots on Windows.

Apart from using the Snipping Tool and Snip & Sketch, there are other ways to capture screenshots on Windows. You can use keyboard shortcuts like Alt + PrtScn to capture just the active window or third-party software such as Greenshot or Lightshot for additional features and customization options.

How can I edit and annotate my screenshots?

After capturing a screenshot on Windows, you can edit and annotate it using various tools. Both the Snipping Tool and Snip & Sketch offer basic editing features like cropping and highlighting. If you need more advanced editing capabilities, consider using image editing software such as Paint.NET or Adobe Photoshop.

Is there a way to share my screenshots with others using the open snipping tool? You can easily capture an image snip of your screen by using the keyboard shortcut or clicking on the snipping tool icon on the taskbar.

Absolutely! Once you have captured a screenshot on Windows, you can easily share it with others.

Easy Guide: How to Update Drivers for Windows 11

If you’re a Windows 11 user, it’s important to keep your system up to date with the latest drivers. Whether you need to download new drivers or update existing ones, having the correct and latest drivers installed guarantees that your hardware and software function smoothly and efficiently. In this article, we will provide a step-by-step guide on how to update drivers for Windows 11, including both manual and automated methods.

Key Takeaways:

  • Updating drivers on Windows 11 ensures optimal performance and compatibility with the latest hardware.
  • You can update drivers for Windows 11 manually or by using driver update software.
  • Windows 11 provides built-in tools for checking and installing driver updates.
  • Follow best practices for updating drivers and troubleshooting common issues to ensure a successful update process.
  • Regularly updating drivers is crucial for improving system performance and stability.

Why Update Drivers for Windows 11?

If you’re wondering why updating drivers on Windows 11 is necessary, here are some reasons:

  • Improved Performance: Newer drivers often come with bug fixes and performance enhancements that can make your hardware run smoother and faster.
  • Compatibility: Newer hardware components may require the latest drivers to function correctly. Without the correct drivers, your system may experience compatibility issues with new hardware.
  • Security: Outdated drivers can leave your system vulnerable to security threats. Keeping your drivers up to date ensures that any vulnerabilities are patched, and your system is secure.

With these benefits in mind, it’s clear that keeping your PC drivers up to date is crucial for optimal performance and stability.

Manual Driver Updates for Windows 11

If you prefer a hands-on approach to updating your drivers, you can manually search for and install the latest versions. Here’s a step-by-step guide to help you through the process:

  1. Identify outdated drivers: First, you need to determine which drivers need updating. You can do this by accessing the Device Manager, which is found by right-clicking the Start button. Look for any devices with a yellow exclamation mark, as this indicates a driver issue. Alternatively, you can download a driver scanning tool to identify all outdated drivers at once.
  2. Find the latest versions: Once you know which drivers need updating, you can search for the latest versions on the manufacturer’s website. Be sure to select the correct driver for your system and hardware. You can also use third-party websites, but be cautious as they may not provide reliable or safe drivers.
  3. Install the drivers: After downloading the latest drivers, you can install them by double-clicking the file and following the installation wizard. Alternatively, you can use the Device Manager to install the driver manually.

It’s important to note that manually updating drivers can be time-consuming, and there’s always a risk of installing the wrong driver or causing system compatibility issues. However, if you’re confident in your technical skills and want more control over the process, manual driver updates may be the best option for you.

Using Driver Update Software for Windows 11

If you’re looking for a more automated approach to update drivers on Windows 11, using driver update software can streamline the process and save you time. These tools scan your system, identify outdated drivers, and download and install the latest versions with just a few clicks.

Driver update software can be especially helpful if you’re not confident in your ability to manually update drivers. It can also be useful if you have a large number of drivers that need updating, or if you simply don’t have the time to go through the manual process.

The Benefits of Using Driver Update Software for Windows 11

  • Time-saving: Driver update software automates the process, saving you time and effort.
  • Simplifies the process: These tools make it easy even for non-technical users to update drivers.
  • One-click updates: With these tools, you can update all your drivers with just a few clicks, avoiding the need to update each one individually.
  • Keeps your system updated: Driver update software ensures that you have the latest drivers for enhanced system stability and performance.

Best Driver Update Software for Windows 11

There are many driver update software programs available for Windows 11, but not all of them are reliable or effective. Here are some of the best driver update tools that you can use to keep your system up-to-date:

SoftwareFeatures
Driver BoosterAutomatically scans for outdated driversOne-click updatesLarge database of driversDriver rollback feature
Driver EasyAutomatically scans for outdated driversOne-click updatesBackup and restore featureDriver rollback feature
IObit Driver BoosterAutomatically scans for outdated driversOne-click updatesLarge database of driversProvides game-boosting drivers

Note: When using driver update software, it’s important to ensure that you download it from a reliable source and that you keep the software itself up-to-date to avoid security vulnerabilities.

Checking for Windows 11 Driver Updates

Windows 11 provides users with a convenient built-in tool for checking and installing the latest drivers for hardware components. Here’s how to use it:

  1. Click on the Start menu and select Settings.
  2. Select Windows Update from the left-hand menu.
  3. Click on the Check for updates button.
  4. Once the scan is complete, any available driver updates will be displayed under Optional updates.
  5. Select the driver updates you want to install and click on Download and install.

It’s important to note that this method may not always provide the most up-to-date drivers for your hardware. If you encounter any issues or want to ensure you have the latest drivers available, it may be best to use one of the methods outlined in the previous sections, such as manual updates or driver update software.

Download Drivers Windows 11

If you prefer to manually download drivers for Windows 11, you can visit the manufacturer’s website for each component and locate the appropriate driver for your specific operating system. Here are the steps:

  1. Determine the manufacturer and model of the hardware component for which you need a driver.
  2. Visit the manufacturer’s website and navigate to the Support or Downloads section.
  3. Locate the driver for your specific hardware component and download it to your computer.
  4. Follow the manufacturer’s instructions for installing the driver.

Remember to always download drivers from reputable sources to avoid potential security risks.Tip: Keep in mind that downloading drivers individually for each component can be time-consuming, especially if you need to update multiple drivers. Consider using a driver update tool to streamline the process.

Best Practices for Updating Drivers on Windows 11

Updating drivers on Windows 11 is a critical task that should be done regularly to ensure optimal system performance. Here are some best practices to follow when updating drivers on your PC.

Create a Restore Point

Before you start updating drivers, it’s always a good idea to create a restore point. This allows you to revert your system to its previous state if something goes wrong during the update process. To create a restore point, go to the Start menu, type “Create a restore point,” and select it from the search results. Then click on “Create” and follow the prompts.

Verify the Driver Version and Compatibility

Before updating a driver, make sure you know the version you want to update to and that it’s compatible with your hardware and Windows 11. You can usually find this information on the manufacturer’s website or within the driver’s properties.

Download Drivers Only from Trusted Sources

Be cautious when downloading drivers from websites other than the manufacturer’s website. They may contain malware or be outdated, causing more harm than good.

Update One Driver at a Time

Updating multiple drivers simultaneously can sometimes lead to conflicts. Instead, update one driver at a time and restart your system if necessary.

Don’t Update Drivers Unless Necessary

If your system is working fine, there may not be a need to update certain drivers. Only update drivers when new features or bug fixes are released, or if a particular driver is causing issues on your system.

Keep an Eye on Driver Updates

Regularly check for driver updates and install them as soon as they become available. You can do this manually or by using driver update software. Keeping your drivers up to date will ensure your system runs smoothly and efficiently.

  • SEO relevant keywords: update drivers windows 11PC drivers update

Troubleshooting Driver Update Problems on Windows 11

Updating drivers on Windows 11 is a crucial task for optimizing system performance and stability. However, sometimes issues can arise during the update process. In this section, we’ll discuss common problems and provide troubleshooting steps to resolve them.

Issue 1: Compatibility Issues

One common issue that can arise when updating drivers on Windows 11 is compatibility issues. If the updated driver is not compatible with your system, it can cause problems like crashes and system freezes. To avoid this issue, make sure to check the system requirements before updating a driver.

Issue 2: Installation Errors

Another issue that can occur during the driver update process is installation errors. This can happen if there are corrupted files or conflicts with existing drivers. To fix this issue, try deleting the old driver and reinstalling the updated one. If the issue persists, trying using a driver update software, which can automatically troubleshoot installation errors.

Issue 3: Blue Screen of Death (BSOD)

If you encounter a Blue Screen of Death (BSOD) after updating a driver, it could be due to a compatibility issue or instability in the updated driver. To fix this issue, you can try rolling back to the previous driver or performing a system restore. Additionally, ensure that you are downloading the driver from a legitimate source to avoid malware or viruses.

Issue 4: Performance Issues

Updating drivers can also sometimes lead to performance issues, like slower system speed or decreased functionality. This could be due to a conflict with other drivers or software. To fix this issue, try uninstalling recently installed software or updating conflicting drivers. You can also check the manufacturer’s website for any known issues or updates.

Issue 5: Device Not Working Properly

If a device is not working properly after updating its driver, it could be due to an incomplete or unsuccessful installation. To fix this issue, try reinstalling the driver or using a driver update software to perform a thorough scan and update. Additionally, ensure that the device is properly connected and functioning.

Importance of Regular Driver Updates for Windows 11

Updating drivers on Windows 11 is not a one-time task but an ongoing process that is crucial for maintaining optimal performance and stability. Regular driver updates ensure that your PC is always compatible with the latest hardware and features, providing a smoother user experience.

Why Regular Driver Updates Are Necessary

Hardware manufacturers frequently release driver updates to fix bugs, improve performance, and add new features. Updating your drivers ensures that your hardware is supported and works seamlessly with your operating system. It also helps to prevent system crashes, freezes, and other issues caused by outdated or incompatible drivers.

Moreover, regular driver updates can help you optimize your PC’s performance, improving its speed, responsiveness, and energy efficiency. Up-to-date drivers ensure that your hardware is running at its best, helping you get the most out of your system.

How Often Should You Update Your Drivers?

There is no fixed schedule for updating drivers on Windows 11, as this varies depending on your hardware and software configuration. However, we recommend checking for updates at least once a month or whenever you encounter performance issues or error messages.

Additionally, you should always update your drivers after a major Windows update, such as a feature update or a cumulative update. These updates may introduce new hardware support or require updated drivers to function correctly.

How to Update Your Drivers Regularly

Updating drivers regularly is easy and straightforward. You can either download and install updates manually from the manufacturer’s website or use driver update software to automate the process.

If you choose to update your drivers manually, make sure to identify the correct hardware model and download the latest compatible driver from the manufacturer’s website. Follow the installation instructions carefully and restart your PC if necessary.

Alternatively, you can use driver update software to scan your system for outdated drivers, download the latest versions, and install them automatically. This approach saves time and effort, and ensures that your drivers are always up to date.

Conclusion

Updating drivers on Windows 11 is crucial for optimal performance and compatibility with the latest hardware. From manual updates to using driver update software, we’ve provided you with various options to choose from based on your preferences.

Regular updates for better performance

Remember that updating drivers is not a one-time task, but an ongoing process. By regularly checking for driver updates, you can ensure that your system and hardware are always up-to-date with the latest features and technologies. This will improve overall system performance and stability.

The importance of following best practices

Following best practices when updating drivers can help you avoid common issues such as driver conflicts, system crashes, or hardware malfunctions. Make sure to create system restore points, backup important data, and uninstall old drivers before installing new ones.

Troubleshooting driver update problems

If you encounter any problems while updating your drivers, don’t panic. Some common driver update issues include incomplete installations, compatibility issues, and incorrect driver versions. Refer to our troubleshooting section for step-by-step instructions on resolving any driver update problems.

In conclusion, by following the steps outlined in this guide, you can ensure that your Windows 11 PC is always running with the latest drivers. This will improve system performance, stability, and compatibility with the latest hardware. Keeping your drivers up-to-date is an essential task for any PC user, so make sure to check for updates regularly and follow best practices when installing them.

FAQ

How often should I update my drivers on Windows 11?

It is recommended to regularly update your drivers on Windows 11 to ensure optimal performance and compatibility. Check for updates at least once a month or whenever new hardware is installed.

Can I update drivers manually on Windows 11?

Yes, you can update drivers manually on Windows 11. In Section 3 of this guide, we provide a step-by-step process for identifying outdated drivers, finding the latest versions, and installing them on your system.

What are the benefits of using driver update software?

Driver update software can automate the process of updating drivers on Windows 11, making it easier and more efficient. These tools can save you time by automatically scanning and installing the latest driver updates for your hardware.

How do I check for driver updates on Windows 11?

Windows 11 provides built-in tools for checking and installing driver updates. In Section 5, we explain how to utilize these tools to ensure your system is always running with the latest drivers.

What should I do if I encounter problems during driver updates on Windows 11?

Occasionally, issues may arise while updating drivers on Windows 11. In Section 7, we discuss common problems and provide troubleshooting steps to help you resolve them.

Why are regular driver updates important for Windows 11?

Regular driver updates are important on Windows 11 as they can improve system performance, stability, and compatibility with the latest hardware and software updates. Keeping your drivers up to date ensures a smooth an

  1.  

    Excel is an incredibly powerful tool for getting meaning out of vast amounts of data. But it also works really well for simple calculations and tracking almost any kind of information. The key for unlocking all that potential is the grid of cells. Cells can contain numbers, text, or formulas. You put data in your cells and group them in rows and columns. That allows you to add up your data, sort and filter it, put it in tables, and build great-looking charts. Let’s go through the basic steps to get you started.

    Create a new workbook


    Excel documents are called workbooks. Each workbook has sheets, typically called spreadsheets. You can add as many sheets as you want to a workbook, or you can create new workbooks to keep your data separate.

    1. Click File, and then click New.

    2. Under New, click the Blank workbook.

      New blank workbook

    Enter your data


    1. Click an empty cell.

      For example, cell A1 on a new sheet. Cells are referenced by their location in the row and column on the sheet, so cell A1 is in the first row of column A.

    2. Type text or a number in the cell.

    3. Press Enter or Tab to move to the next cell.

    Apply cell borders


    1. Select the cell or range of cells that you want to add a border to.

    2. On the Home tab, in the Font group, click the arrow next to Borders, and then click the border style that you want.

      Excel Ribbon Image

    For more information, see Apply or remove cell borders on a worksheet .

    Apply cell shading


    1. Select the cell or range of cells that you want to apply cell shading to.

    2. On the Home tab, in the Font group, choose the arrow next to Fill Color Button image, and then under Theme Colors or Standard Colors, select the color that you want.

    For more information about how to apply formatting to a worksheet, see Format a worksheet.

    Use AutoSum to add your data


    When you’ve entered numbers in your sheet, you might want to add them up. A fast way to do that is by using AutoSum.

    1. Select the cell to the right or below the numbers you want to add.

    2. Click the Home tab, and then click AutoSum in the Editing group.

      AutoSum on the Home tab

      AutoSum adds up the numbers and shows the result in the cell you selected.

    For more information, see Use AutoSum to sum numbers

    Create a simple formula


    Adding numbers is just one of the things you can do, but Excel can do other math as well. Try some simple formulas to add, subtract, multiply, or divide your numbers.

    1. Pick a cell, and then type an equal sign (=).

      That tells Excel that this cell will contain a formula.

    2. Type a combination of numbers and calculation operators, like the plus sign (+) for addition, the minus sign (-) for subtraction, the asterisk (*) for multiplication, or the forward slash (/) for division.

      For example, enter =2+4=4-2=2*4, or =4/2.

    3. Press Enter.

      This runs the calculation.

      You can also press Ctrl+Enter if you want the cursor to stay on the active cell.

    For more information, see Create a simple formula.

    Apply a number format


    To distinguish between different types of numbers, add a format, like currency, percentages, or dates.

    1. Select the cells that have numbers you want to format.

    2. Click the Home tab, and then click the arrow in the General box.

      Format Number box on the Home tab

    3. Pick a number format.

      Number format gallery

      If you don’t see the number format you’re looking for, click More Number Formats. For more information, see Available number formats.

    Put your data in a table


    A simple way to access Excel’s power is to put your data in a table. That lets you quickly filter or sort your data.

    1. Select your data by clicking the first cell and dragging to the last cell in your data.

      To use the keyboard, hold down Shift while you press the arrow keys to select your data.

    2. Click the Quick Analysis button Quick Analysis button in the bottom-right corner of the selection.

      Selected data with Quick Analysis Lens button visible

    3. Click Tables, move your cursor to the Table button to preview your data, and then click the Table button.

      Quick Analysis Tables gallery

    4. Click the arrow Filter drop-down arrow in the table header of a column.

    5. To filter the data, clear the Select All check box, and then select the data you want to show in your table.

      Select All box in the Sort and Filter gallery

    6. To sort the data, click Sort A to Z or Sort Z to A.

      Sorting commands in the Sort and Filter gallery

    7. Click OK.

    For more information, see Create or delete an Excel table

    Show totals for your numbers using Quick Analysis


    The Quick Analysis tool (Excel 2016) let you total your numbers quickly. Whether it’s a sum, average, or count you want, Excel shows the calculation results right below or next to your numbers.

    1. Select the cells that contain numbers you want to add or count.

    2. Click the Quick Analysis button Quick Analysis button in the bottom-right corner of the selection.

    3. Click Totals, move your cursor across the buttons to see the calculation results for your data, and then click the button to apply the totals.

      Quick Analysis Totals gallery

    Add meaning to your data using Quick Analysis


    Conditional formatting or sparklines can highlight your most important data or show data trends. Use the Quick Analysis tool (Excel 2016) for a Live Preview to try it out.

    1. Select the data you want to examine more closely.

    2. Click the Quick Analysis button button image in the bottom-right corner of the selection.

    3. Explore the options on the Formatting and Sparklines tabs to see how they affect your data.

      Quick Analysis Formatting gallery

      For example, pick a color scale in the Formatting gallery to differentiate high, medium, and low temperatures.

      Data with a color scale conditional format

    4. When you like what you see, click that option.

    Learn more about how to analyze trends in data using sparklines.

    Show your data in a chart using Quick Analysis


    The Quick Analysis tool (Excel 2016) recommends the right chart for your data and gives you a visual presentation in just a few clicks.

    1. Select the cells that contain the data you want to show in a chart.

    2. Click the Quick Analysis button button image in the bottom-right corner of the selection.

    3. Click the Charts tab, move across the recommended charts to see which one looks best for your data, and then click the one that you want.

      Quick Analysis Charts gallery

      Note: Excel shows different charts in this gallery, depending on what’s recommended for your data.

    Learn about other ways to create a chart.

    Sort your data


    To quickly sort your data

    1. Select a range of data, such as A1:L5 (multiple rows and columns) or C1:C80 (a single column). The range can include titles that you created to identify columns or rows.

    2. Select a single cell in the column on which you want to sort.

    3. Click A to Z command in Excel that sorts A to Z or smallest number to largest to perform an ascending sort (A to Z or smallest number to largest).

    4. Click Z to A command in Excel that sorts Z to A or largest number to smallest to perform a descending sort (Z to A or largest number to smallest).

    To sort by specific criteria

    1. Select a single cell anywhere in the range that you want to sort.

    2. On the Data tab, in the Sort & Filter group, choose Sort.

    3. The Sort dialog box appears.

    4. In the Sort by list, select the first column on which you want to sort.

    5. In the Sort On list, select either ValuesCell ColorFont Color, or Cell Icon.

    6. In the Order list, select the order that you want to apply to the sort operation — alphabetically or numerically ascending or descending (that is, A to Z or Z to A for text or lower to higher or higher to lower for numbers).

      For more information about how to sort data, see Sort data in a range or table .

    Filter your data


    1. Select the data that you want to filter.

    2. On the Data tab, in the Sort & Filter group, click Filter.

      The Sort and Filter group on the Data tab

    3. Click the arrow Filter drop-down arrow in the column header to display a list in which you can make filter choices.

    4. To select by values, in the list, clear the (Select All) check box. This removes the check marks from all the check boxes. Then, select only the values you want to see, and click OK to see the results.

    For more information about how to filter data, see Filter data in a range or table.

    Save your work


    1. Click the Save button on the Quick Access Toolbar, or press Ctrl+S.

      Save button on the Quick Access Toolbar

      If you’ve saved your work before, you’re done.

    2. If this is the first time you’ve save this file:

      1. Under Save As, pick where to save your workbook, and then browse to a folder.

      2. In the File name box, enter a name for your workbook.

      3. Click Save.

    Print your work


    1. Click File, and then click Print, or press Ctrl+P.

    2. Preview the pages by clicking the Next Page and Previous Page arrows.

      Next and Previous buttons in the Print Preview pane

      The preview window displays the pages in black and white or in color, depending on your printer settings.

      If you don’t like how your pages will be printed, you can change page margins or add page breaks.

    3. Click Print.

    Activate and use an add-in


    1. On the File tab, choose Options, and then choose the Add-Ins category.

    2. Near the bottom of the Excel Options dialog box, make sure that Excel Add-ins is selected in the Manage box, and then click Go.

    3. In the Add-Ins dialog box, select the check boxes the add-ins that you want to use, and then click OK.

      If Excel displays a message that states it can’t run this add-in and prompts you to install it, click Yes to install the add-ins.

    For more information about how to use add-ins, see Add or remove add-ins.

    Find and apply a template


    Excel allows you to apply built-in templates, to apply your own custom templates, and to search from a variety of templates on Office.com. Office.com provides a wide selection of popular Excel templates, including budgets.

    For more information about how to find and apply templates, see Download free, pre-built templates.


This article presents basic concepts in Microsoft Word to help new users get started in creating sophisticated, professional-looking documents.

Start and quit Word


  1. Click the Start button Windows Start button or press the Windows key on your keyboard to display the Start menu.

  2. In the list of applications, find Word and click it. The startup screen appears and Word starts.

    Tip: The first time you start Word, the Microsoft Software License Agreement might appear.

To quit Word, click the x button Close in the upper-right corner of your screen.

If you made any changes since you last saved the document, a message box appears asking if you want to save changes. To save the changes, click Yes. To quit without saving the changes, click No. If you clicked the x button by mistake, click Cancel.

Top of Page

A tour of the Word user interface


Word user interface

1    Title Bar: Displays the file name of the document that is being edited and the name of the software you are using. It also includes the standard Minimize, Restore, and Close buttons.

2    Quick Access Toolbar: Commands that are frequently used, such as SaveUndo, and Redo are located here. At the end of the Quick Access Toolbar is a pull-down menu where you can add other commonly used or commonly needed commands.

3    File Tab: Click this button to find commands that act on the document itself rather than the content of the document, such as NewOpenSave asPrint, and Close.

4    Ribbon: Commands needed for your work are located here. The appearance of the Ribbon will change depending on the size of your monitor. Word will compress the ribbon by changing the arrangement of the controls to accommodate smaller monitors.

5    Edit Window: Shows the contents of the document you are editing.

6    Scroll Bar: Lets you change the display position of the document you are editing.

7    Status Bar: Displays information about the document you are editing.

8    Zoom slide control: Lets you change the zoom settings of the document you are editing.

Top of Page

Save and open a document


In Word, you must save your document so you can quit the program without losing your work. When you save the document, it is stored as a file on your computer or in a network location. Later, you can open the file, change it, and print it.

To save a document, do the following:

  1. Click the Save button in the Quick Access toolbar. The Save As window appears.

  2. Choose a location where you want to save the document and enter a file name in the File name box. To change the file name, type in a new file name.

  3. Click Save.

You can open a Word document to resume your work. To open a document, do the following:

  1. Open File Explorer, and click Documents. A list of documents appears.

  2. If the document you want to work on is on the list, click the file name to open the document. If the document isn’t on the list, navigate to the location where you stored your file, and double-click the file. The Word startup screen appears, and then the document is displayed.

Tip: You can also open a document from within Word by clicking the File tab and then clicking Open. To open a document you saved recently, click Recent.

Top of Page

Edit and format text


Before you edit or format text, you must first select the text. Follow the steps below to select text.

  1. Place the curser at the beginning of the text you’d like to edit or format and then press the left mouse button.

  2. While holding down the left mouse button, move it to the right (called “dragging”) to select the text. A background color is added in the location of the selected text to indicate the selection range.

You can find most text formatting tools by clicking the Home tab and then choosing from the Font group.

Word 2010 Ribbon

1    This is the Home tab.

2    This is the Font group on the Home tab.

3    This is the Bold button. See the table below for the names and functions of all the buttons in the Font group.

Button

Name

Function

Font Button

Font

Changes the font.

Font Size Button

Font Size

Changes the size of the text.

Grow Font Button

Grow Font

Increases the text size.

Shrink Font Button

Shrink Font

Decreases the text size.

Change Case Button

Change Case

Change all the selected text to uppercase, lowercase, or other common capitalizations.

Clear Formatting Button

Clear Formatting

Clears all formatting for the selected text, leaving only the plain text.

Bold Button

Bold

Makes the selected text bold.

Italic Button

Italic

Italicizes the selected text.

Underline Button

Underline

Draws a line under the selected text. Click the dropdown arrow to select the type of underline.

Strikethrough Button

Strikethrough

Draws a line through the middle of selected text.

Subscript Button

Subscript

Creates subscript characters.

Superscript Button

Superscript

Creates superscript characters.

Text Effects Button

Text Effects

Apply a visual effect to selected text, such as shadow, glow, or reflection.

Text Highlight Color Button

Text Highlight Color

Makes text look like it was marked with a highlighter pen.

Font Color Button

Font Color

Changes the text color.

Top of Page

Use styles


Styles allow you to quickly format major elements in your document, such as headings, titles, and subtitles. Follow the steps below to apply styles to the text in your document.

  1. Highlight the text you want to change.

  2. On the Home tab in the Styles group, pause the pointer over any style to see a live preview directly in your document. To see the complete list of styles, click the More arrow to open the Styles pane.

  3. To apply the style that’s most appropriate for your text, just click it.

When you’re done applying styles to the individual elements, Word lets you use a style set to change the look of your whole document all at once.

  1. On the Design tab, in the Document Formatting group, choose one of the predefined style sets, such as Basic or Casual. Pause the pointer over any style set to see a live preview directly in your document. To see more predefined style sets, click the down arrow on the right side of the Document Formatting group.

  2. To apply the style set that’s most appropriate for your text, just click it.

Top of Page

Modify line spacing in a document


With Word, you can easily change the spacing between lines and paragraphs in your document.

  1. On the Design tab, click Paragraph Spacing to see a drop-down list of paragraph spacing options. Pause the pointer over any paragraph spacing style to see a live preview directly in your document.

  2. When you find the look you want, click it.

Tip: To define your own paragraph spacing, choose Custom Paragraph Spacing.

Top of Page

Preview and print


It’s easy to preview what the layout of your document will look like when printed without actually printing.

  1. Click the File tab.

  2. Click Print to see a preview of your document.

  3. Review the Settings for any properties you might want to change.

  4. When the properties for your printer and document appear the way that you want them to, click Print.


Ultimate Guide to System Restore Windows 11: Step by Step

 
Ultimate Guide to System Restore Windows 11

Welcome to our comprehensive guide on how to perform a system restore in Windows 11. If you’re experiencing software issues, driver conflicts, or simply want to revert your system to a previous state, system restore can help you safeguard and recover your Windows 11 computer efficiently.

In this guide, we’ll walk you through the step-by-step process of system restore, including how to access the feature, create system restore points, restore your computer to a previous state, troubleshoot with system restore, and best practices for using this powerful feature.

With our detailed instructions and expert tips, you’ll be equipped with the knowledge and skills to effectively use system restore and protect your Windows 11 computer.

Key Takeaways

  • System restore is a powerful feature that can help you safeguard and recover your Windows 11 computer.
  • By following our step-by-step guide, you’ll be equipped with the knowledge and skills to effectively use system restore in Windows 11.
  • Creating system restore points can provide you with a safety net before making any major changes to your computer.
  • System restore can be an effective troubleshooting tool when dealing with system-related issues.
  • Regularly creating restore points and managing disk space are important best practices to maximize the benefits of system restore in Windows 11.

Understanding System Restore

Before delving into the intricacies of system restore on Windows 11, it is essential to grasp the concept and purpose of the system restore utility in Windows 11.

The system restore utility is an inbuilt feature in Windows 11 that allows users to revert their system to a previously saved restore point. This point contains all system configurations, settings, and data from a specific date and time. The utility serves as a safeguard for your Windows 11 computer, helping you to recover your system in case of any complications or changes made to your computer that may have led to a reduced system performance or instability.

The system restore utility is easy to use and enables you to restore your computer to a previously functional state when issues arise. With system restore, you can quickly undo any recent changes made to your system. This includes uninstalling an application or driver, updating software, modifying system settings, or applying system-wide changes.

Using System Restore on Windows 11

The process of using system restore on Windows 11 requires creating restore points, which can be done manually or automatically. These restoration points are created periodically or before significant changes are made to your computer’s system.

At times, software issues or driver conflicts may arise even after creating restore points. Such instances necessitate using system restore to recover your system to a previously saved restore point.

To use system restore, you need to access the system restore utility and follow the step-by-step prompts of the system restore wizard. The wizard provides you with different options to choose the desired restore point. After selecting a restore point, the system restore utility verifies the selection and initializes the restoration process.

Pro Tip: Always create restore points before making any significant changes to your computer’s system to avoid losing essential data and configurations.

How to Access System Restore in Windows 11

Performing a system restore in Windows 11 is an effective way to revert your computer to a previous state if you’re experiencing software issues, driver conflicts, or just want to undo any changes. Here are the steps to access and use the system restore feature in Windows 11:

How to Access System Restore in Windows 11
  1. Click the Start menu and type “system restore” in the search box.
  2. Click on the “Create a restore point” option that appears in the search results.
  3. Click on the “System Restore” button located in the “System Properties” window that pops up.
  4. On the “System Restore” window, select “Next” to proceed.
  5. Choose the desired restore point from the list of available options. You can also choose to show more restore points by checking the “Show more restore points” box.
  6. Review your selected restore point and click “Next” to proceed.
  7. Confirm your selected restore point and click “Finish.” Your computer will start the system restore process.

Alternatively, you can also access system restore from the Control Panel or Command Prompt. Follow these steps:

  1. Open the Control Panel and click on “System and Security.”
  2. Select “File History” and then click on “Recovery.”
  3. Click on “Open System Restore.”
  4. Follow the same steps as mentioned above.

To use Command Prompt, follow these steps:

  1. Click the Start menu and type “Command Prompt.”
  2. Right-click on “Command Prompt” and select “Run as administrator.”
  3. Type “rstrui.exe” in the Command Prompt window and hit Enter.
  4. Follow the same steps as mentioned above.

By following these steps, you can easily access and use system restore to troubleshoot and revert changes on your Windows 11 computer.

Creating System Restore Points

Creating System Restore Points

One of the best ways to make the most out of the Windows 11 system restore feature is to create restore points regularly. A restore point is essentially a snapshot of your system’s current state. This means that if anything goes wrong, you can quickly and easily restore your computer to a previous state using the restore point.

Steps to Create a System Restore Point in Windows 11

  1. Open the Start menu and type “Create a Restore Point” in the search bar, then click on the top result.
  2. Click on the “Create” button in the System Protection tab.
  3. Enter a description for the restore point (for example, “Before installing new software”) and click “Create” again.
  4. Windows 11 will create the restore point and notify you when it’s done.

It’s important to note that system restore points don’t take up a significant amount of disk space, so it’s a good idea to create them regularly, especially before making any major changes to your computer, such as upgrading to a new operating system or installing new software.

By creating restore points regularly, you’ll have a safety net that allows you to easily revert back to a previous state if anything goes wrong.

Restoring Your Computer to a Previous State

Restoring your computer to a previous state is a powerful tool that can help you undo recent changes that have caused problems on your Windows 11 computer. Here are the steps to follow:

  1. First, go to the Start menu and type “system restore”. Then, select “Create a restore point” from the search results.
  2. Next, select “System Restore” from the System Properties window.
  3. In the System Restore window, select “Next” to proceed.
  4. Choose a restore point from the list of available restore points. You can check the “Show more restore points” box to see additional restore points.
  5. Click “Next” and then “Finish” to start the restoration process.
  6. Your computer will restart during the process, and you should not interrupt it.
  7. After the restoration process is complete, your computer will return to the selected restore point, and any changes made after that point will be undone.

It’s important to note that system restore will not affect your personal files, such as documents, photos, or emails. However, it will uninstall any software or drivers that were installed after the restore point was created. You may need to reinstall any programs that were uninstalled.

By using the system restore feature in Windows 11, you can undo any unwanted changes and get your system back to a stable state. Make sure to create restore points regularly, so you can always revert to a previous state if needed.

Troubleshooting with System Restore

System restore is not only useful to revert your Windows 11 computer to a previous state but also to troubleshoot various system-related issues. In this section, we’ll explore how to use system restore utility in Windows 11 to troubleshoot problems effectively.

Identifying the Problem

The first step in troubleshooting with system restore is identifying the problem your computer is facing. Once you have identified the issue, determine the date and time when it started occurring.

Creating a Restore Point

If you haven’t already created a restore point, create one before continuing with the troubleshooting process. This will give you a fallback option in case things go wrong while troubleshooting.

Performing System Restore

To perform system restore, follow the steps we highlighted in Section 5. Choose a restore point that was created before the problem occurred, and let the system restore wizard do its work.

Testing Your Computer

After the system restore process completes successfully, test your computer to see if the issue has been resolved. If the issue is still present, you may need to choose an earlier restore point and repeat the process until you find the point that resolved the problem.

Note: System restore may not always be the solution to your problem. If the issue persists even after performing system restore, you may need to consider alternative troubleshooting methods or seek professional assistance.

System Restore Best Practices

System restore is an essential tool for safeguarding your Windows 11 computer and recovering from system-related issues. To help you make the most out of this feature, we’ve compiled a list of best practices for system restore:

Regularly Create Restore Points

Creating regular restore points is crucial to ensuring that you have a safety net before making any significant changes to your computer. It’s recommended to create a restore point before installing any software or making any significant system changes. This way, if anything goes wrong, you can quickly revert your system to a previous state.

Manage Disk Space

If you have limited disk space on your Windows 11 computer, it’s crucial to manage your restore points’ size. By default, Windows 11 allocates a specific amount of space for system restore. However, you can adjust this space allocation to ensure that you have sufficient disk space for other tasks. To do this, go to the system properties and adjust the disk space allocation for system protection.

Use Other Recovery Options When Appropriate

Although system restore is an effective tool, there may be situations where it’s not enough to troubleshoot your system. In these cases, you may need to use other recovery options, such as a system reset or a clean install of Windows 11. Make sure to weigh the pros and cons of each option to ensure that you choose the best approach for your specific needs.

Regularly Update Your System

Keeping your Windows 11 computer up to date with the latest security patches and software updates can help prevent system-related issues that may require system restore. By regularly updating your system, you’ll ensure that your computer is running smoothly and efficiently.

Only Use System Restore When Necessary

System restore should be used as a last resort when dealing with system-related issues. Before reverting your system to a previous state, make sure to troubleshoot the issue and explore other potential solutions. This way, you can avoid potentially losing any data or system configurations.

System Restore Alternatives in Windows 11

While system restore is an excellent tool, Windows 11 also offers alternative methods to revert changes and troubleshoot system issues. Let’s explore some of these options:

Reset this PC

If you want to start fresh with a clean slate, resetting your PC might be the best option. This feature allows you to keep your personal files while removing all installed apps and settings. Resetting your PC is a straightforward process that won’t take much time.

Uninstalling recent updates

Another option is to uninstall any recently installed updates that may have caused the issue you’re experiencing. To do this, navigate to Settings > Update & Security > Windows Update > View update history > Uninstall updates. Here, you can select the update you want to remove and follow the on-screen instructions.

System Image Recovery

System Image Recovery is a powerful tool that allows you to restore your computer to a previous state using a system image. A system image is a backup of your computer’s entire operating system, programs, and files. Creating a system image is similar to creating a system restore point but offers a more comprehensive backup solution.

Keep in mind that System Image Recovery requires you to have previously created a system image. If you haven’t done so, it won’t be an option for you.

By understanding these alternatives to system restore, you’ll have a better idea of how to troubleshoot and revert changes in Windows 11. Choose the best option that suits your specific needs and preferences.

Conclusion

Without a doubt, system restore is a crucial utility for safeguarding your Windows 11 computer. By following this comprehensive guide, you should now be equipped with the knowledge and skills to effectively use system restore to troubleshoot and revert changes on your computer.

Final Thoughts

We hope this guide has provided you with valuable insights into the world of system restore on Windows 11. It’s always wise to keep regular backups of your most important files and folders, as well as creating restore points before making any major changes to your system.

Stay Up to Date

With the constant evolution of technology, it’s important to stay informed about the latest updates and features. Be sure to check for updates regularly to ensure that your Windows 11 computer is running smoothly and efficiently.

Thank You for Reading

We appreciate you taking the time to read this guide and hope it has been helpful to you. If you have any feedback or additional questions, feel free to reach out to us via our contact page.

FAQ

What is system restore?

System restore is a feature in Windows 11 that allows you to revert your computer’s settings, programs, and system files to a previous state, effectively undoing any recent changes and troubleshooting certain issues.

Why would I need to perform a system restore in Windows 11?

There are several reasons you may need to perform a system restore in Windows 11. It can help you resolve software issues, driver conflicts, and restore your system to a previous stable state after encountering problems or changes that have caused instability.

How do I access system restore in Windows 11?

There are multiple ways to access system restore in Windows 11. You can use the Start menu, Control Panel, or Command Prompt. Each method provides step-by-step instructions to access the system restore feature.

How do I create system restore points in Windows 11?

Creating system restore points in Windows 11 allows you to save specific system configurations. We’ll guide you through the process, ensuring you have a safety net before making any major changes to your Windows 11 computer.

How do I restore my computer to a previous state using system restore?

Restoring your computer to a previous state using system restore is straightforward. We’ll explain how to navigate through the system restore wizard, allowing you to choose and restore your Windows 11 computer to a desired point in time.

Can system restore help with troubleshooting in Windows 11?

Yes, system restore can be an effective troubleshooting tool in Windows 11. We’ll show you how to utilize system restore to troubleshoot problems, such as software conflicts and unstable system behavior, helping you resolve issues more efficiently.

What are some best practices for using system restore in Windows 11?

To maximize the benefits of system restore in Windows 11, we’ll share some best practices. These include regularly creating restore points, managing disk space, and other tips to ensure you get the most out of this powerful feature.

Are there alternatives to system restore in Windows 11?

While system restore is an excellent tool, Windows 11 also offers alternative methods to revert changes and troubleshoot system issues. We’ll explore these alternatives and help you determine which approach is best suited for your specific needs